Wednesday, January 29, 2014

I'm Still Here!

Well, I am not sure how, but I am back up and running. 

In case you are not aware, I got an email from Google to renew my domain registration a few weeks ago. I attempted to do so, but the directions they sent were bogus to say the least and I could not for the life of me figure out how to enter my credit card, even though I had one of on file with them already. Apparently, I was not the only one having issues. There are message boards all over the internet dedicated to the topic. Anyway, I did not get my card entered by the deadline. The next day I checked to see if the blog was still active and alas, it was not. When I typed in the domain name a message came up saying it had expired and the blog no longer existed. A few days ago I emailed Google and have not heard back. However, I visited the blog today and it is still here! 

I can't say I will be back to post anytime soon, but it is nice to know that all my hard work is not lost and that I have the option to post when I have time. Hopefully this is not a fluke and my domain will remain active. I have pictures of lots of treats I have made in the last year, mainly in the birthday realm. I hope to have a few posts at some point to showcase those creations. Thanks for hanging in there with me!
Pin It!

Sunday, November 10, 2013

Pecan Pie Muffins


I adore pecans. I always pick up a large bag of them when I visit Sam's because it's such a good deal and I know I will use them. My favorite way to eat them? Tossed with a dab of melted butter and roasted in the oven for about 10 minutes. Oh, holy crap. Roasting them enhances their flavor by leaps and bounds. If I need some for a recipe I make sure to roast some extra because it's a given that half of them will disappear. And not because I am the David Copperfield of the baking world.


I saw a recipe for Pecan Pie Muffins on Love Grows Wild yesterday and knew I had to make them for breakfast this morning. Now, lately I have been finding recipes online and getting super excited about them only to be let down with the end result. These? Incredible! They really do taste like a pecan pie in a muffin. They are so fantastic!


They are very simple to make and utterly delicious. The recipe makes 8 muffins, but I put less in each cup and stretched it out to 10 muffins so I could get each one under 200 calories. But, that really is useless if I am going to eat three during a photo shoot.


Click here for the recipe. You will not be sorry!

Pin It!

Saturday, October 19, 2013

Yes, It's Been a While

My first attempt at a two-tiered cake
 
It's been over six months since I last posted. I know. I am a terrible blogger. I teased you with all sorts of good treats and then left this place a desolate ghost town with nothing but tumbleweed in my wake. I apologize. I have had some changes in my life in the last year that have taken up all of my focus. I've still been baking (though not as much as I had been) but have not felt up to photographing and posting pictures. Over a year ago Mr. Mac and I split up. I am now a single parent and each night once I get Mini Mac in bed I just want to crash. My biggest pleasure right now is climbing in bed at the end of the day and hanging out with my iPad. (Don't tell anyone about how wild and crazy my life has become. I wouldn't want to have CPS show up at my door.) I am not complaining. I have a great job that supports my daughter and I, and we have an amazing support system. I am incredibly blessed all around. I'm just so busy that when I finally get free time it's usually not enough to post how I want to post. So, I just haven't had the motivation to share on here since Easter. Every now and again I would pull up the blog and see that Easter cake staring back at me and cringe at how long it's been. I finally could not take it anymore. Plus, I just completed one of my most fun projects to date and I had to share it with all of you. I apologize for the massively uncreative pictures. One thing at a time.
 
My friends Jessica and Bobby are getting married today! She asked if I would make a small cake and some cupcakes. Above is a picture of the cake. This is big for me. This is the first two-tiered cake I have made. I have watched countless videos on how to create a support system in a stacked cake so I knew I could do it. It really is not hard at all. A few bubble tea straws and a thin wooden dowel and this baby was good to go. It's white cake with raspberry filling and vanilla buttercream. It's covered with piped rosettes.
 
Pumpkin with cinnamon cream cheese frosting
 
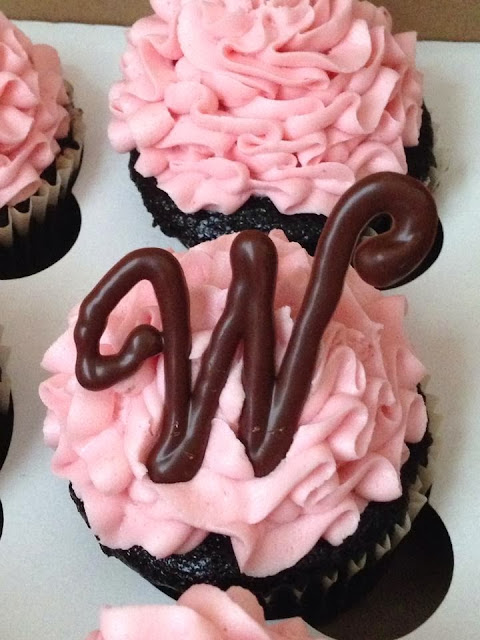
Jessica also wanted a few cupcakes. I made three flavors. Pumpkin with cinnamon cream cheese frosting, chocolate with raspberry buttercream, and good old fashioned yellow with my Aunt Joanna's fabulous chocolate buttercream. I piped dark chocolate W's (their monogram initial) to use as embellishments on the pumpkin and chocolate cupcakes. Then for the yellow cupcakes I piped white chocolate letters so that they would stand out against the chocolate frosting.
 
 
I have a trick for piping the letters. I printed out the W's using Microsoft Word. I selected the font I wanted and made rows of them in the size I needed the letters. I laid down 5 of the pages next to one another on my kitchen table and covered them with a strip of wax paper using the letters underneath as a guide. I "traced" the letters onto the wax paper with melted chocolate in a piping bag. The first few letters were just for practice but once I got about 5 done I had a good rhythm going.


They are so simple but add such an amazing touch. You might remember that I did this technique once before for some wedding shower cupcakes. I was vey happy with the overall results.
 
 
Thanks for hanging in there. I hope to be back soon to share some of the projects I did while I was away. That is if I can retrieve them from the hard drive of my dead former computer. (Woo-hoo, technology!) Plus, the Holidays are coming up and I have many treats in my arsenal.
 
Happy wedding day, Jessica and Bobby!

Pin It!

Wednesday, April 17, 2013

"Perfectly" Chocolate Bundt Cake With Chocolate Ganache


I know Easter is done but this post is long overdue. The photo shoot took place a few days before Easter and I took advantage of my mom's beautiful place settings and arrangements. Besides, bunnies and bird eggs are still relevant. It's spring after all!

 
I made a chocolate bundt cake using my new favorite go-to chocolate cake recipe, Hershey's "Perfectly Chocolate" Chocolate Cake. The end result is such an amazingly flavorful cake. To make it even more delectable, I topped it off with a layer of chocolate ganache. This cake is so rich and fantastic. Add a scoop of vanilla ice cream and your head will be swimming.


Hershey's "Perfectly Chocolate" Chocolate Cake

Ingredients

2 cups sugar
1 cup cocoa (I use Hershey's Special Dark)*
1-3/4 cups all purpose flour
1-1/2 tsp baking soda
1-1/2 tsp baking powder   
1 tsp salt
2 eggs
1/2 cup vegetable oil
I cup milk
2 tsp vanilla
1 cup strong hot coffee*

Directions 

  • Preheat oven to 350. Grease and flour a 12 cup bundt pan
  •  Stir together sugar, flour, cocoa, baking powder, baking soda and salt in large bowl. Add eggs, milk, oil and vanilla; beat on medium speed of mixer 2 minutes. Stir in hot coffee. (Batter will be thin). 
  •  Pour batter into pan and bake 50-55 minutes. Cool 15 minutes in pan then turn out onto a wire rack to cool thoroughly.

Chocolate Ganache

Ingredients

9 oz. bittersweet chocolate, chopped (can use chocolate chips)
1 cup heavy cream

Directions 
  
  • Place chocolate in a heat proof bowl.
  • In a small saucepan, heat cream over low-medium heat until bubble start to form around the edges.
  • Pour hot cream over chocolate and stir utnil the chocolate is fully melted.
  • Pour ganache over cake slowly making sure to evenly coat.*
  • Allow ganache to set up, about two hours. 


      ~~~~~~~~~~~~~~~~~~~~~~~~~~~~~~~~~~~~~~~~~~~~~~~~~~~

*A few things....
  
~Hershey's recipe calls for 3/4 cup cocoa. I think a cup does the cake even more justice.

~Their recipe also calls for 1 cup of boiling water but I opted to use coffee. Coffee is such a compliment to chocolate. It really amps up the flavor so why not use it?

~PLEASE, make sure the ganache is not thin. I made the mistake of turning my mom's kitchen into a massacre-like scene during my second attempt making ganache. I used milk chocolate instead of bittersweet and it did not set up near as quick. I made the mistake of thinking once it hit the cake some sort of magic would happen and it would thicken. Uh, no. It ran off the cake platter and anywhere it could travel. And let me tell ya, it traveled FAST. (Did you know that chocolate syrup was used for blood in black and white  movies? I TOTALLY see why now.) Let the ganahce set up until it is thick, about at a batter consistency. Pour on just a bit to see how it goes and if it is too thin, pop it in the fridge and stir it every 5 minutes until it thickens a bit. If you have to spread it around the cake with a spatula, that is better than having to chase it down counter tops and drip it ALL OVER a freshly mopped floor. I cussed so much that day.   

Pin It!

Friday, March 29, 2013

Rose Easter Cake


Easter candy, you are killing me. 

This time of year is always tough. Right as I decide I am going to get in shape for summer, BAM! I forget about the 5 boxes of Girl Scout Cookies I ordered and they show up on a day when I could eat every single one in a sitting. Then, just as I get those out of the picture I am inundated with all that delicious and tempting Eater candy. (I think I had more  fun shopping for Easter Bunny candy for Mini Mac than I did shopping for Christmas. That aisle is so much fun.)

Oh, and did I mention that ALL of the above takes place during Lent? Yeah. Pretty dang tough for this gal. I had to quit giving up sweets for Lent because I failed miserably EVERY year.

I made this cake for my friend Sherry for Easter. Her in laws are coming into town and she wanted something special for their visit. They are not big chocolate fans so she decided on strawberry. I make a mean strawberry cake. My secret? Just a boxed mix, but in place of the water I use pureed strawberries. It makes SUCH a difference. 


I have had this rose pattern on my to-do list for a while now. I thought it would be perfect for an delicate Easter cake. Yes, the large rose to the left screams "Look at me! I want all the attention!" But I think it's pretty for my first try. Check out the tutorial I found at I Am Baker.


And then since it's Easter, I nestled a few Cadbury Mini Eggs in the center. These are the perfect candy for Easter baked goods.


Aren't they adorable?

One last tip that I must share. I was on a discussion board at Wilton.com one day and the topic was how to get a moist cake. One of the commenters shared that her grandmother ALWAYS put any cake she made in the freezer for at least 24 hours and then thawed it prior to decorating. She claims that her cakes were always so super moist and comparable to bakery cakes. Once my layers were cooled, I wrapped them twice in plastic wrap, tied each one up in a plastic bag and tucked them into my freezer. I laid them out to thaw the night before I was set to decorate. They appeared super moist to me, but I can't wait to hear the reviews from Sherry.


A very Happy Easter to you and yours!

Pin It!

Thursday, March 21, 2013

Easy Cake Mix Cookies


I love Reese's ANYTHING. Pieces, cups, mini cups, eggs, cereal (Have you had this? It rocks.), ice cream bars (These rock even more), Blizzards, you name it. If it has Reese's in the title I am likely to salivate profusely over it. As with any other sweet treat these days, I approach this love affair with much moderation. But let me tell you, it is super tough.

Recently on a walk, I saw an unopened Reese's egg just lying casually under a tree next to the sidewalk. I was sure there was an early Easter egg hunt of some sort going on, but no one was around. It crossed my mind that it would be so easy to take off with that little guy and treat myself in celebration of all my walking calories burned. But, I stayed strong and passed that sucker up for the sake of my rear end and thighs. Boy, was it hard. I am bound to believe that my arch nemesis strategically planted the egg there to bring me down.


Need a quick Reese's fix? These cookies are perfect. They are oh so delicious and pretty much the easiest cookies I have ever made!

Easy Cake Mix Cookies

1 -18.5 oz. devil's food cake mix*
3/4 cup chunky peanut butter
2 tbsp milk
2 large eggs
1 cup Reese's Pieces

-Preheat oven to 350. Combine cake mix, peanut butter, eggs and milk in a large mixing bowl. Beat at low speed until blended. Stir in Reese's Pieces. Drop dough by rounded tablespoons onto a greased cookie sheet. Press down a bit to flatten. Bake 7-9 minutes or until lightly browned. Once out of the oven, press down again to flatten a bit more.** Let rest about 5 minutes then remove to cooling racks.

~~~~~~~~~~~~~~~~~~~~~~~~~~~~~~~~~~~~~~~~~~~~~~~~~~
 
*We are getting jipped on cake mixes these days. Manufacturers have reduced the size of the mixes but we are paying the same price. Many run between 15.5 ounces and 16.25. The standard is 18.5 ounces. I have found that the store brand mixes have stayed true to this amount. And they are just as good.

**These cookies do not spread well on their own. The first batch I made came out baked in the exact shape they went in, round balls. That is why I flatten them before I put them in the oven and again right when they come out. This second time is not necessary, but I just like a flatter cookie. 

Pin It!

Tuesday, March 12, 2013

Springtime Magic Bars


The weather at my house this weekend was such a wonderful taste of Spring. It was beautiful and it got me in the mood for some type of pretty springtime dessert.

These ARE truly magic. I know I often say,  "These are SO unbelievably good," but honestly, THESE are the best things I think I have ever made. OK, best BARS I have ever made. I had to specify "bars" because I just remembered a cupcake recipe I am going to share with you guys soon and it's pretty unbelievable, too. But seriously, bar-wise, these rock the house.


I adapted this recipe from one I came across at Lauren's Latest last week. Love her site. I didn't have the toppings her recipe required (chopped Oreos, mini chocolate chips and mini marshmallows--YUM!) so I used what I had. These bars are so easy. It's a graham cracker crust topped with sweetened condensed milk and then pretty much whatever you want to throw on top. I used chopped peanut butter sandwich cookies and pastel Sixlets. The magic happens when they are baked. The milk turns all caramely (that's a word, right?) and binds the ingredients together.


Right when they came out of the oven, I topped them with chopped Reese's Minis. Look at those guys. Simply gorgeous. Kate Upton has some serious competition in that shot above. I have SUCH a thing for peanut butter and chocolate. I was never a fan of peanut butter sandwiches or even PB & J for that matter. (I was an odd child. I also didn't like pancakes, waffles or donuts for breakfast. I wanted oatmeal. Don't worry. I have more than made up for that in my adult years.) But give me something sweet that has peanut butter as an ingredient and you could probably get me to do most anything you needed me to. Except push ups. I loathe push ups. And ironing.


To make them prettier, not to mention more delicious (if that is even possible), I drizzled on some melted white chocolate.

I love a recipe that can be adapted so easily. This is definitely one of those. As I mentioned, you can top these bars with basically whatever you want. With all the fun Easter candy out right now, lots of experimentation could be had with this recipe. I do recommend, however, if you want to use Reese's cups or something similar in texture, throw them on AFTER they come out of the oven. That way, they hold their shape but melt just enough to stay put on the bar.

Springtime Magic Bars

1 1/2 cups graham cracker crumbs
1/2 cup melted butter
1-14 oz can sweetened condensed milk
1 1/2 cups chopped peanut butter sandwich cookies
1/2 cup pastel Sixlets or M & M's
1 cup Reese's Minis cut in half
1/4 cup melted white chocolate (optional)

-Mix graham cracker crumbs and butter until blended well. Press into the bottom of a sprayed 9 x 13 pan. Pour on the condensed milk. Spread evenly. Sprinkle on the cookies and Sixlets. Bake at 350 for 15-20 minutes, until edges are browned and bars are set. 

-Once out of the oven, sprinkle on the Reese's cups. Let bars cool completely.

-Carefully invert out of pan onto chopping block. (I invert them onto one board, then lay another board on top and flip them again so that they are right side up.)

-Drizzle with the white chocolate. Once that is set, cut into 16 bars.


For Lauren's original version with Oreos and marshmallows (that woman is a genius) check out the recipe here.


Pin It!