Showing posts with label Cake. Show all posts

Saturday, October 19, 2013

Yes, It's Been a While

My first attempt at a two-tiered cake
 
It's been over six months since I last posted. I know. I am a terrible blogger. I teased you with all sorts of good treats and then left this place a desolate ghost town with nothing but tumbleweed in my wake. I apologize. I have had some changes in my life in the last year that have taken up all of my focus. I've still been baking (though not as much as I had been) but have not felt up to photographing and posting pictures. Over a year ago Mr. Mac and I split up. I am now a single parent and each night once I get Mini Mac in bed I just want to crash. My biggest pleasure right now is climbing in bed at the end of the day and hanging out with my iPad. (Don't tell anyone about how wild and crazy my life has become. I wouldn't want to have CPS show up at my door.) I am not complaining. I have a great job that supports my daughter and I, and we have an amazing support system. I am incredibly blessed all around. I'm just so busy that when I finally get free time it's usually not enough to post how I want to post. So, I just haven't had the motivation to share on here since Easter. Every now and again I would pull up the blog and see that Easter cake staring back at me and cringe at how long it's been. I finally could not take it anymore. Plus, I just completed one of my most fun projects to date and I had to share it with all of you. I apologize for the massively uncreative pictures. One thing at a time.
 
My friends Jessica and Bobby are getting married today! She asked if I would make a small cake and some cupcakes. Above is a picture of the cake. This is big for me. This is the first two-tiered cake I have made. I have watched countless videos on how to create a support system in a stacked cake so I knew I could do it. It really is not hard at all. A few bubble tea straws and a thin wooden dowel and this baby was good to go. It's white cake with raspberry filling and vanilla buttercream. It's covered with piped rosettes.
 
Pumpkin with cinnamon cream cheese frosting
 
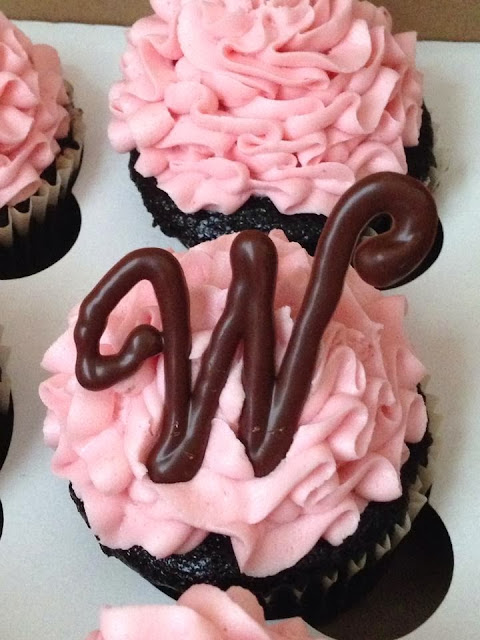
Jessica also wanted a few cupcakes. I made three flavors. Pumpkin with cinnamon cream cheese frosting, chocolate with raspberry buttercream, and good old fashioned yellow with my Aunt Joanna's fabulous chocolate buttercream. I piped dark chocolate W's (their monogram initial) to use as embellishments on the pumpkin and chocolate cupcakes. Then for the yellow cupcakes I piped white chocolate letters so that they would stand out against the chocolate frosting.
 
 
I have a trick for piping the letters. I printed out the W's using Microsoft Word. I selected the font I wanted and made rows of them in the size I needed the letters. I laid down 5 of the pages next to one another on my kitchen table and covered them with a strip of wax paper using the letters underneath as a guide. I "traced" the letters onto the wax paper with melted chocolate in a piping bag. The first few letters were just for practice but once I got about 5 done I had a good rhythm going.


They are so simple but add such an amazing touch. You might remember that I did this technique once before for some wedding shower cupcakes. I was vey happy with the overall results.
 
 
Thanks for hanging in there. I hope to be back soon to share some of the projects I did while I was away. That is if I can retrieve them from the hard drive of my dead former computer. (Woo-hoo, technology!) Plus, the Holidays are coming up and I have many treats in my arsenal.
 
Happy wedding day, Jessica and Bobby!

Pin It!

Wednesday, April 17, 2013

"Perfectly" Chocolate Bundt Cake With Chocolate Ganache


I know Easter is done but this post is long overdue. The photo shoot took place a few days before Easter and I took advantage of my mom's beautiful place settings and arrangements. Besides, bunnies and bird eggs are still relevant. It's spring after all!

 
I made a chocolate bundt cake using my new favorite go-to chocolate cake recipe, Hershey's "Perfectly Chocolate" Chocolate Cake. The end result is such an amazingly flavorful cake. To make it even more delectable, I topped it off with a layer of chocolate ganache. This cake is so rich and fantastic. Add a scoop of vanilla ice cream and your head will be swimming.


Hershey's "Perfectly Chocolate" Chocolate Cake

Ingredients

2 cups sugar
1 cup cocoa (I use Hershey's Special Dark)*
1-3/4 cups all purpose flour
1-1/2 tsp baking soda
1-1/2 tsp baking powder   
1 tsp salt
2 eggs
1/2 cup vegetable oil
I cup milk
2 tsp vanilla
1 cup strong hot coffee*

Directions 

  • Preheat oven to 350. Grease and flour a 12 cup bundt pan
  •  Stir together sugar, flour, cocoa, baking powder, baking soda and salt in large bowl. Add eggs, milk, oil and vanilla; beat on medium speed of mixer 2 minutes. Stir in hot coffee. (Batter will be thin). 
  •  Pour batter into pan and bake 50-55 minutes. Cool 15 minutes in pan then turn out onto a wire rack to cool thoroughly.

Chocolate Ganache

Ingredients

9 oz. bittersweet chocolate, chopped (can use chocolate chips)
1 cup heavy cream

Directions 
  
  • Place chocolate in a heat proof bowl.
  • In a small saucepan, heat cream over low-medium heat until bubble start to form around the edges.
  • Pour hot cream over chocolate and stir utnil the chocolate is fully melted.
  • Pour ganache over cake slowly making sure to evenly coat.*
  • Allow ganache to set up, about two hours. 


      ~~~~~~~~~~~~~~~~~~~~~~~~~~~~~~~~~~~~~~~~~~~~~~~~~~~

*A few things....
  
~Hershey's recipe calls for 3/4 cup cocoa. I think a cup does the cake even more justice.

~Their recipe also calls for 1 cup of boiling water but I opted to use coffee. Coffee is such a compliment to chocolate. It really amps up the flavor so why not use it?

~PLEASE, make sure the ganache is not thin. I made the mistake of turning my mom's kitchen into a massacre-like scene during my second attempt making ganache. I used milk chocolate instead of bittersweet and it did not set up near as quick. I made the mistake of thinking once it hit the cake some sort of magic would happen and it would thicken. Uh, no. It ran off the cake platter and anywhere it could travel. And let me tell ya, it traveled FAST. (Did you know that chocolate syrup was used for blood in black and white  movies? I TOTALLY see why now.) Let the ganahce set up until it is thick, about at a batter consistency. Pour on just a bit to see how it goes and if it is too thin, pop it in the fridge and stir it every 5 minutes until it thickens a bit. If you have to spread it around the cake with a spatula, that is better than having to chase it down counter tops and drip it ALL OVER a freshly mopped floor. I cussed so much that day.   

Pin It!

Friday, March 29, 2013

Rose Easter Cake


Easter candy, you are killing me. 

This time of year is always tough. Right as I decide I am going to get in shape for summer, BAM! I forget about the 5 boxes of Girl Scout Cookies I ordered and they show up on a day when I could eat every single one in a sitting. Then, just as I get those out of the picture I am inundated with all that delicious and tempting Eater candy. (I think I had more  fun shopping for Easter Bunny candy for Mini Mac than I did shopping for Christmas. That aisle is so much fun.)

Oh, and did I mention that ALL of the above takes place during Lent? Yeah. Pretty dang tough for this gal. I had to quit giving up sweets for Lent because I failed miserably EVERY year.

I made this cake for my friend Sherry for Easter. Her in laws are coming into town and she wanted something special for their visit. They are not big chocolate fans so she decided on strawberry. I make a mean strawberry cake. My secret? Just a boxed mix, but in place of the water I use pureed strawberries. It makes SUCH a difference. 


I have had this rose pattern on my to-do list for a while now. I thought it would be perfect for an delicate Easter cake. Yes, the large rose to the left screams "Look at me! I want all the attention!" But I think it's pretty for my first try. Check out the tutorial I found at I Am Baker.


And then since it's Easter, I nestled a few Cadbury Mini Eggs in the center. These are the perfect candy for Easter baked goods.


Aren't they adorable?

One last tip that I must share. I was on a discussion board at Wilton.com one day and the topic was how to get a moist cake. One of the commenters shared that her grandmother ALWAYS put any cake she made in the freezer for at least 24 hours and then thawed it prior to decorating. She claims that her cakes were always so super moist and comparable to bakery cakes. Once my layers were cooled, I wrapped them twice in plastic wrap, tied each one up in a plastic bag and tucked them into my freezer. I laid them out to thaw the night before I was set to decorate. They appeared super moist to me, but I can't wait to hear the reviews from Sherry.


A very Happy Easter to you and yours!

Pin It!

Wednesday, October 31, 2012

Sweet Buttermilk Glaze


Please forgive the out of focus picture. I was tired. I was not into it. My mind was elsewhere. Like getting this cake in my mouth as fast as possible.

My mom has made an Amish Carrot Cake for years that, instead of being topped with icing, is topped with what is called a Buttermilk Glaze. It is to die for. It's comes out almost like a caramel sauce. This cake has been requested by many a child for their birthday. Now, the above cake is not the Amish Carrot Cake. (I WILL share that with you guys sometime.) It is a mixture of a carrot cake mix and a spice cake mix. 

Here's the deal.


I was making some carrot cupcakes for a friend's birthday. While I LOVE the above Decadent Carrot Cake mix from Duncan Hines, it's just a bit too dense for cupcakes so I mixed in some of the spice cake batter. 


After the cupcakes were done I had some of the combined batters left and since I LOATHE wasting food I poured the mixture into a 9 x 13 dish to make a cake.  I didn't want to make icing for it, but remembered that glorious buttermilk glaze and knew it would be perfect for this cake.


And it's so easy. Just boil together some sugar, butter, buttermilk, corn syrup and baking soda until it becomes amber in color. Stir in some vanilla.


Transfer to a pourable container.


Once the cake is out of the oven, poke holes in it with a skewer or straw.


While the cake is still warm, pour the glaze slowly over the top. The slower you pour the better. That gives the glaze time to get down in all the little nooks and crannies.


Lastly, cut a slice and prepare to be wowed.

Sweet Buttermilk Glaze

1 cups sugar
1/2 cup buttermilk
1/2 cup unsalted butter
1 TB light corn syrup
1 1/2 tsp baking soda
1 tsp vanilla

-In a medium saucepan, bring all the ingredients (except the vanilla) to a boil over medium high heat stirring constantly, Continue to boil until it reaches an amber color. 

-Turn off heat and stir in vanilla. 

-Pour over warm cake.

~~~~~~~~~~~~~~~~~~~~

Happy Halloween!!!


Pin It!

Tuesday, September 25, 2012

I Was Abducted by Aliens


I'm back! Yes, I am still alive and kickin'. Don't worry. I was not abducted by aliens. (As far as I know.) It's just that life has been happening at full force for the last couple of months. I have continued to bake some but just have not had the time or desire to post for a bit. But not to fear. I have plenty of creations and favorite things to share with my faithful readers. Thanks for hanging in there, guys. You are the reason I do this!

So on to cakes...

I made this squeal-worthy cake this weekend for a girl named Ally. Ally loves One Direction. Are you familiar with the band? If you don't have a tween in the house you might not be, unless you are like me and follow lots of celebrity gossip blogs. They were on the UK's X Factor a few seasons back and their songs are super catchy. Basically they are the British equivalent of The Backstreet Boys or five Justin Biebers. In my day it was New Kids on the Block. Oh, that Donnie Wahlberg. He was such a bad boy.


So here are the guys of One Direction (from L to R): Naill, Zayn, Louis, Liam and Harry. (I had to use Google images to figure this out. I don't know them THAT well.)  Apparently one is dating Demi Levato, another dates cougars and another cheats on his girlfriend frequently. Again, I get my information from gossip blogs so what do I know?

I used a sugar image for this cake. I love sugar images. (Remember the Caillou cake?) You can get just about anything you want on a cake without having Rembrandt drawing skills. I searched "One Direction cake sugar image" and found it on eBay. There were several different designs. The company even personalized it for free!


I decorated the cake in pink and purple icing and made it even more special by adding pearl embellishments.


This cake was so much fun to make and I was so happy with how it turned out! The birthday girl loved it, too.


And by the way, Harry is my favorite. (It doesn't hurt that he is the only one whose name I can remember.) I think it's his curly locks. He's just a cutie pie.


I'll see you guys again by the end of the week! (I promise with sprinkles on top.)

Pin It!

Friday, June 22, 2012

Happy Birthday, Mini Mac!


Well, I can't very well call her "Baby Mac" anymore now that she is 2. I thought "Mini Mac" would be a good replacement.

My BABY is 2! What? How did that happen? Before I had her I often heard people say, "I can't believe my little one is already [insert age here]!" I would think, "Yeah, well kids grow up, what did you expect?" But I get it now. Time flies SO much. It seriously feels like it was only 6 months ago that I was in the hospital giving birth to that 9 pound baby. I swear, she came out looking like she was a month old.

I have mentioned before that she adores Caillou. I was so excited when I came across an edible sugar image in a birthday catalog I got in the mail. I hate junk mail but I am a sucker for any catalog or circular that sells fun stuff. And my curiosity paid off! The image is super cute and so easy to use!

I mixed up a Funfetti batter and divided it between three 8 inch cake pans. I had some Oreos on hand (I am as shocked as you are that they have made it this long without meeting their demise) so I crushed them up, mixed them with some buttercream and used it as a sort of filling. I piped a dam...


...and spread in the filling. It looks kind of funny because I used my off-set spatula to spread the dam into the filling to make up for some holes.


...put on a crumb coat...


...and tinted some icing. Caillou is drawn in primary colors so I decided to use red, blue and yellow for the accents. 


After I smoothed on the top coat of icing, I peeled the image off its backing and gently laid it on the cake. It reminded me of an iron-on transfer. Remember those? I had to be very gentle when peeling it off the paper, but it was simple to do. I will definitely be using these in the future. I can't wait to see what types of images are out there!


I piped dots all over the cake. I like the simplicity of the dots. I considered using a star tip but it just didn't seem to fit Caillou's personality. I think he would approve of the dots.


I can't wait for her to see this cake. I know she is going to flip!

Happy Birthday to the best thing that has ever happened to me. Words cannot express how completely blessed your daddy and I feel to have been chosen as your parents. You have defined love for us and it's greater than we could ever imagine. 

~~~~~~~~~~~~~~~~~

Thank you SO much to my aunt Joanna for the beautiful cake stand! I did not have one and she thought of me at an antique store one day. I feel so fancy not having to put Mini Mac's cake on a plastic cake carrier!! I love you so much Joanna and I will think of you every time I use it! Which will be A LOT!!

Pin It!

Tuesday, June 5, 2012

Banana Cake with Vanilla Bean Frosting


Why did the banana go to the doctor? Because he wasn't peeling well.

Why are bananas never lonely? Because they hang around in bunches. 

And my personal favorite....

Why did the banana go out with the prune? Because he couldn't find a date.

Thanks, folks! I'll be here all night! Don't forget to tip your wait staff.

Now that the funny is out of the way, let's get down to business. The business of banana cake with vanilla bean icing. It's wonderful business. The kind of business I want to conduct as much as possible.

Don't let the "vanilla bean" part of this recipe scare you. I just wanted to break in the ones I just purchased. You can just as easily use vanilla extract for this icing.  The banana cake is what packs the punch of flavor here. The icing, whether vanilla bean or extract is involved, accents it perfectly.


Banana Cake with Vanilla Frosting (Recipe credit: Baked Bree)

2/3 cup sugar
2 tablespoons room temperature butter
1/2 cup sour cream
3/4 cup mashed ripe bananas (about 2 bananas)
1 egg
1 teaspoon vanilla
1 cup flour
1/4 teaspoon salt
1/2 teaspoon baking soda

Vanilla Bean Frosting:*

2 tablespoons room temperature butter
1 & 1/4 cups confectioners sugar
1/4 cup heavy cream, or milk
1/2 vanilla bean, seeded and scraped OR 1/2 teaspoon of vanilla
pinch of salt 

Directions:

~Preheat oven to 375 degrees.
~Cream together butter and sugar. mix in sour cream.
~Add the bananas and vanilla.
~Add the flour, salt and baking soda. Stop mixing as soon as it is all combined. 
~Pour the batter into a 9 x 9 sprayed pan.
~Bake for 20-25 minutes or until an inserted toothpick comes out clean. 
~For the frosting, cream the butter and and slowly add the confectioners sugar. 
~Add the cream or milk and beat until fluffy. (If icing is too thin, add more confectioners sugar.)
~Add the vanilla and pinch of salt.
~Spread frosting over the cake once it has completely cooled. 

 ~~~~~~~~~~~~~~~~~

*I doubled the cake recipe and used a 9 x 13 pan. I also doubled the icing recipe but it didn't make enough icing for my tastes and was also a bit thin. I like a thicker icing. I played around and added a bit more butter, then added confectioners sugar and milk until I got them amount and consistency I wanted. The good thing about icing is that if it's too thin, you add more sugar. If it's too thick, you add more milk. Just taste it as you go along and you'll be fine.

Pin It!

Thursday, May 17, 2012

How to Pipe Carrots


I believe in cake mix.

I believe in store bought icing.

I believe in short cuts, as long as they don't skimp on taste or quality.

Some bakers would consider these statements blasphemy. That if you don't make a cake or icing from scratch you are breaking some kind of unspoken baker's code. 

I almost always use cake mixes. And every now and then, if a project doesn't call for a sturdy icing*, I use store bought. I work full time and have a toddler and husband to take care of, so some days I don't have time to make something totally from scratch. (I am sure you can relate.) It doesn't make the baking any less special. It still comes from the heart and it still has homemade touches. And I get just as many oooo's and ahhhh's in the end.

A friend of mine had a very special birthday and when I asked what kind of cake he would like, he requested carrot in a simple sheet form. I used Duncan Hines Decadent Classic Carrot Cake Mix.  It's not your normal bland carrot cake boxed mix. It comes with actual shredded carrots and raisins. It's most excellent.

Store bought icing can be a little thin, but for a sheet cake it works great. We all know cream cheese icing and carrot cake go together like Kathy Lee and Hoda. I am a fan of Pillsbury cream cheese icing. In fact, when I buy icing it's usually the one I choose. I have even had people request it saying, "Remember that cream cheese icing you used that time? I want that kind." (Take that, baker's code.)

Here's a trick when using store bought icing: whip it with an electric mixer for about a minute. It adds air to the icing which lightens it up, plus it almost doubles what you start with. It's a win win.

Since the cake and icing did not take as long as my usual endeavors, I wanted to do a bit of decorating. I had a carrot cupcake from Caramanda's a while back and there was a tiny carrot piped onto the top of it. It was adorable. I decided to try it out on this cake. 

I used two containers of icing for this cake, but reserved about a fourth of it for decorating. I tinted half of that reserved icing orange and the other half green.  I put a Wilton 67 leaf tip on the bag of green icing and a 12 tip on the orange. 

Wilton 67 Leaf Tip

Wilton 12 Round Tip

Let me preface all of this by saying, it is TREMENDOUSLY hard to photograph with one hand and pipe with the other. That is why there are not photographs of the whole process in action, AND why the pictures are not the best quality. My next step is to get a tripod and figure out the timer on my camera. I have a whole new appreciation for all my favorite food bloggers after this. You gals must have a third hand you're keeping under wraps.

So first, take the leaf tip and hold it at a 45 degree angle. Squeeze pretty hard and drag slowly so that you get a wide section of icing. Then, slow down the pressure to almost nothing and pull so that the icing forms into a point at the bottom.


Next, using the orange icing with the round tip, place the tip directly over the bottom pointed end of the leaf you just made. Again, apply a good amount of pressure and drag.


Once you get about that much orange icing, slow the pressure to almost nothing and slowly pull away to form the pointed end of the carrot.


It's that easy!! And what a cute addition to a carrot cake.

I piped that carrot at the wrong end of the leafy greens. The other carrots better not make fun of him.

Anyone on the receiving end of baked goods is going to feel extra special. He or she is not thinking about whether it took you 3 hours or  45 minutes to make that gift of food. They are simply thrilled that they were thought enough of for someone to go out of their way to cook for them. It really is the thought that counts. When you take the time to mix a batter, bake it and cover it with icing, you are telling someone that they are important and special to you. Ya know, cooking for others just may be the answer to world peace.

~~~~~~~~~~~~~~~~~

*Because store bought icing is a bit on the creamier side, I usually make my own icing for cupcakes or goods where the icing needs to stand up and stay in place. However, I have had luck with pre-made icing for frosting cupcakes by mixing in some powdered sugar to stiffen up the icing a bit.

Pin It!

Sunday, May 13, 2012

Happy Mother's Day!


Happy Mother's Day to all the Mom's out there! I hope you have a fabulous day and get spoiled to the max!    (Who's for bringing back "to the max?" Anyone?...No?... Yeah, it wasn't one of the best phrases to come out of the 80's. I prefer "gag me with a credit card and put me on layaway.")     

Baby Mac spent the night with her grandparents Friday night. Since I didn't wake up to my normal Mommy routine yesterday, I got an ambitious streak and decided to make cakes for some special women in my life as Mother's Day gifts. 

Because I am still learning, each time I bake I like to try something new. I had recently bought some 6 inch pans (so far I have only used 8 inch) and decided to break those out and make some smaller cakes. 


My mom really liked the ruffle cake I made earlier in the week. I wanted to replicate that style, but decided to try a different method. Instead of piping in a vertical fashion I piped horizontally. I still started at the bottom, but went around the cake in layers of ruffles instead of straight up in rows. Here is a video that shows the technique. 


I tried something else new this time around. A filling. I have used strawberries before but I really wanted to go with a curd type filling this time.  I found a strawberry rhubarb fruit filling at Kroger and it sounded delicious. And as it turned out, it WAS delicious.

It's so simple to fill a cake. Simply pipe a dam of frosting around the edge of the cake layer and spread the filling in the middle. The dam keeps the filling from seeping to the outside of the cake once it's frosted. 

That black spot is a strawberry, I swear. It's shape is very unfortunate and it scared me, too, at first.

I am all about taking advantage of ready made ingredients. There is something to be said for totally homemade food. However, when I come across something that helps me get done quicker, I go for and don't blink an eye. After all, the finished product is still homemade.

Also, between the cost for the ingredients and the time it would have taken me to make it, this filling was a steal at $4.89! (It was a Private Selection item. Have you tried Private Selection? So far I have never been disappointed with a single product.)


I recently ordered a bunch of gum paste flowers from Wholesale Sugar Flowers including the one above. I thought they added a nice touch to the cakes. They have such a fun site. If you are a baking geek like me you'll enjoy it. 


My next goal is to talk one of the recipients of these cakes into giving up a slice to this mom.

Happy Mother's Day, everyone!

Pin It!