Showing posts with label Cupcakes. Show all posts

Saturday, October 19, 2013

Yes, It's Been a While

My first attempt at a two-tiered cake
 
It's been over six months since I last posted. I know. I am a terrible blogger. I teased you with all sorts of good treats and then left this place a desolate ghost town with nothing but tumbleweed in my wake. I apologize. I have had some changes in my life in the last year that have taken up all of my focus. I've still been baking (though not as much as I had been) but have not felt up to photographing and posting pictures. Over a year ago Mr. Mac and I split up. I am now a single parent and each night once I get Mini Mac in bed I just want to crash. My biggest pleasure right now is climbing in bed at the end of the day and hanging out with my iPad. (Don't tell anyone about how wild and crazy my life has become. I wouldn't want to have CPS show up at my door.) I am not complaining. I have a great job that supports my daughter and I, and we have an amazing support system. I am incredibly blessed all around. I'm just so busy that when I finally get free time it's usually not enough to post how I want to post. So, I just haven't had the motivation to share on here since Easter. Every now and again I would pull up the blog and see that Easter cake staring back at me and cringe at how long it's been. I finally could not take it anymore. Plus, I just completed one of my most fun projects to date and I had to share it with all of you. I apologize for the massively uncreative pictures. One thing at a time.
 
My friends Jessica and Bobby are getting married today! She asked if I would make a small cake and some cupcakes. Above is a picture of the cake. This is big for me. This is the first two-tiered cake I have made. I have watched countless videos on how to create a support system in a stacked cake so I knew I could do it. It really is not hard at all. A few bubble tea straws and a thin wooden dowel and this baby was good to go. It's white cake with raspberry filling and vanilla buttercream. It's covered with piped rosettes.
 
Pumpkin with cinnamon cream cheese frosting
 
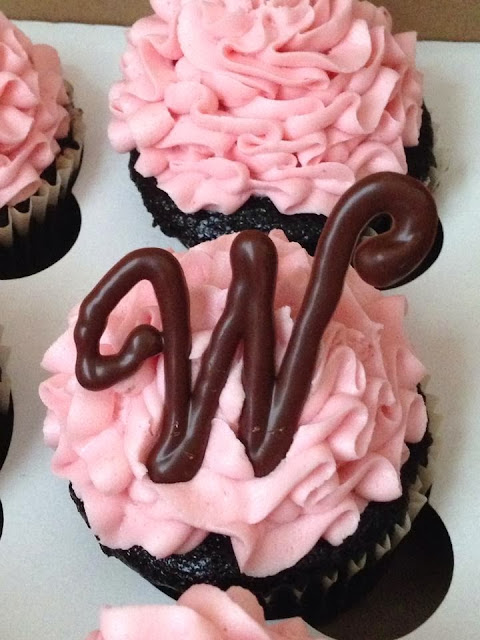
Jessica also wanted a few cupcakes. I made three flavors. Pumpkin with cinnamon cream cheese frosting, chocolate with raspberry buttercream, and good old fashioned yellow with my Aunt Joanna's fabulous chocolate buttercream. I piped dark chocolate W's (their monogram initial) to use as embellishments on the pumpkin and chocolate cupcakes. Then for the yellow cupcakes I piped white chocolate letters so that they would stand out against the chocolate frosting.
 
 
I have a trick for piping the letters. I printed out the W's using Microsoft Word. I selected the font I wanted and made rows of them in the size I needed the letters. I laid down 5 of the pages next to one another on my kitchen table and covered them with a strip of wax paper using the letters underneath as a guide. I "traced" the letters onto the wax paper with melted chocolate in a piping bag. The first few letters were just for practice but once I got about 5 done I had a good rhythm going.


They are so simple but add such an amazing touch. You might remember that I did this technique once before for some wedding shower cupcakes. I was vey happy with the overall results.
 
 
Thanks for hanging in there. I hope to be back soon to share some of the projects I did while I was away. That is if I can retrieve them from the hard drive of my dead former computer. (Woo-hoo, technology!) Plus, the Holidays are coming up and I have many treats in my arsenal.
 
Happy wedding day, Jessica and Bobby!

Pin It!

Thursday, February 14, 2013

Happy Valetine's Day!


Mini Mac is having her first Valentine's Party today. She was thrilled. Because she has to question everything these days she asked me, "Mommy, what do Balentine's do?" Talk about creativity in an answer. I had to think a while on that and then said something along the lines of cards and hearts. Keeping it simple.

For her party I made strawberry cupcakes with buttercream icing. I embellished them with pink sugar pearls and chocolate hearts. I used the method from the wedding shower cupcakes only I melted white chocolate and tinted it pink with some Americolor gel. 

I almost forgot to take a picture. I remembered as I was getting them out of my car and snapped one with my phone. Breathtaking, I know.

Happy Valentine's Day to you and yours!


Pin It!

Friday, November 30, 2012

Cupcake Times Two


Today is Clarissa's birthday! She is my student worker and such an asset to me. She is thorough, a quick learner and dependable. So for her special day I made cupcakes topped with mini cupcakes. These are so fun!

I saw this idea last year and it just seemed like so much work. Baking mini cupcakes actually takes more work than making the larger ones, if that makes any sense at all. Then a few weeks ago I saw a post on Annie's blog With Sprinkles on Top. Instead of baking mini cupcakes, she had a trick up her sleeve: miniature Reese's cups! How genius is that?! Take the foil off, pipe icing on top and embellish with sprinkles. Looks just like the real thing!


I am a sucker for miniatures. I once saw a tiny bottle of Heinz ketchup and went into cuteness overload.

Forgive me for the low quality pictures. My camera was out of commission last night and I had to use my phone. Also, I searched quite a while for the right staging materials for my pictures, but eventually had to settle with my simple counter top because Mini Mac was going sprinkle crazy. I told her she couldn't have anymore but a minute later she was making excuses to "clean" my floor. She found a loophole in the "no more sprinkles" rule and began wiping my floor with a paper towel saying, "Mommy, I clean you floor!" leading me to believe she was simply being super helpful to me. In reality she was infiltrating fallen sprinkles each time I turned me head. She really had me thinking she was just having a super fun time wiping down my floor. I should have known better. That child has become too smart for her own good. But she told me I was a good "cooker" so I tend to fold like origami a lot these days.


Happy Birthday, Clarissa!!


Pin It!

Friday, November 16, 2012

Wedding Shower Cupcakes


I LOVE these cupcakes. I was so pleased with the finished product! These were made for a wedding shower, hence the chocolate monogram. I got the idea for the monogram from Leslie, The Hungry Housewife. (I guess you have figured out by now that she is pretty much my food blogging idol.) She made these cupcakes for my other blogging idol, Kristan. Lots of food bloggers threw her a virtual baby shower for her little Lucy set to arrive any day now. I love the idea of a virtual baby shower!


If you haven't already been to either of these ladies' sites, you must check them out. These girls are incredibly creative, not to mention mega hilarious. Leslie is here and Kristan here. I assure you, they will make your day!


Pin It!

Wednesday, August 1, 2012

Lemon Curd Filled Cupcakes


I love lemons. I put lemon in my tea, squeeze lemon on fish and chicken and of course, lemon rocks out a dessert any day.

The above cupcakes were inspired by this stuff:


We recently had a Trader Joe's open here in town and while I was there I found Imported English Lemon Curd. I could put a straw in this and go nuts. It is SO good. Yes, I could make my own lemon curd, but when it's this good at $2.99 a jar, why go to that trouble?

I also recently got this handy little gadget.


It's a cupcake corer. It remove the middle of a cupcake to make room for fillings. How fun is that? 

I decided to put these two items to the test and make some lemon curd filled cupcakes with lemon butter cream. A friend of mine had a daughter come into town for a visit and she loves lemon desserts. I thought these would be the perfect "Welcome Home" treat!


I started with a lemon cupcake. I used a white cake mix and added a couple tablespoons of lemon baking emulsion and a tablespoon of lemon zest. Baking emulsions are fantastic. Extracts contain alcohol. When baked, the alcohol evaporates taking some of the flavor with it. With emulsions, the flavor is "encased" in gum which helps it hold it's qualities. I am a big fan. Especially of this brand. I use the Princess flavor in a lot of my baked goods and always in my vanilla buttercream icing. A blogger I follow uses the Butter flavor in lots of stuff and she swears it makes a pie crust to die for.


Next, I cored out the middle of the cakes.


Mini Mac especially enjoyed this part. When using the corer this is what happens:


So you end up with a pile of these.


Lemony bites of heaven.

Next, I spooned some curd into each cupcake...


...and topped them with some lemon buttercream.


I just made a basic buttercream icing and added 3 tablespoons of lemon juice and tablespoon of lemon zest.


These cupcakes are so refreshing especially after chilling in the fridge for a while. Not to mention they are pretty simple to make. 

I just love the cupcake corer and I can't wait to see what other cupcake creations I can come up with!


Pin It!

Tuesday, July 24, 2012

Cupcake Bouquet


How fun is this? A friend found this on Pinterest one day and asked if I would make it for her grandmother's birthday. It takes some time, but the results are SO worth it!


Start with cupcakes that have been decorated using a middle-to-outside swirl so that they resemble a flower. 


Insert a Styrofoam ball into a flower pot. There are several different sizes so I suggest taking your pot with you to test out which size works best. 


Insert toothpicks into the ball wherever you want the cupcakes to go. Here is a tip: leave your toothpicks pretty high. If you insert them too far, they will be too short and the cupcakes will slowly fall off. For some of the cupcakes I used three toothpicks.


Close up view of how the toothpicks should stand.


Once you have the cupcakes secure, cut strips of green tissue paper...


...then fold them accordion style at one end and insert between the cupcakes.


After the tissue paper was between all the cupcakes and all empty spaces were filled,  I then used a glue gun to secure some pieces around the outside edges to hide any of the ball that might be showing. Then I glued a white ribbon around the base of the ball in order to have a clean edge.  (I apologize I did not get any action or close up shots of this.)


What's better than flowers and cake? Both! This cupcake bouquet is sure to make anyone's day over-the-top special.


Pin It!

Friday, June 15, 2012

Minnie Mouse, Take Two


My friend Karen's daughter, Kylee, is turning two tomorrow. We were pregnant at the same time and she delivered her a week before Baby Mac.  She asked if I would make some Minnie Mouse cupcakes for her special day and of course I said yes!


The last time I made Minnie Mouse cupcakes I used Oreos. This time I decided to work on my fondant skills. 


I piped on some pink buttercream and added some pink sugar. I made marshmallow fondant and cut circles out for the ears and fashioned bows from strips I cut from some fondant I tinted pink.


I was so happy with how they turned out! But the icing on the cake, or should I say cupcake, was Mr. Mac's reaction. See, he is a man of very little words. Usually when I show him my creations I get a head nod and a "That's cool, Babe." Which is great. I know in Mr. Mac terms that means he likes them and he is proud of me. But, when I opened the box to show him these, his eyes got big and he said, "Wow, those are awesome!" That let me know that I am getting better at my craft and that I made something extra special. My day was made. Heck, my week was made!


Happy Birthday, Kylee! I hope you have the best birthday ever!


Pin It!

Friday, June 8, 2012

Gluten-Free Chocolate Peanut Butter Cupcakes


I have featured recipes for Chocolate Gluten Free Cupcakes and some basic Chocolate Peanut Butter Cupcakes. Well, this go around I merged the two recipes to make one super FAN-FREAKIN-TASTIC gluten-free cupcake! I know I said before that this gluten-free recipe is fabulous, but I have actually made a change to it that has made it even better, if that is possible. And the addition of peanut butter will just blow your mind. 

I made these for my cousin Ellen's birthday a few weeks ago and she agreed, no one would ever know they are gluten-free and in fact they are WAY better than lots of regular cupcakes out there. Even if you don't have  an aversion to gluten, these cupcakes are an incredibly delicious and healthier alternative to the standard version.


My co-worker Terri's husband, Tom, has a gluten allergy and she asked me to make something for his birthday. I knew immediately I had to make these for him.

He is a die hard Tennessee fan so I tinted the icing orange and made the flags I talked about in my tutorial yesterday. Don't give Tom a hard time, UK fans. Terri bleeds blue so it evens things out. 


Gluten-Free Chocolate Peanut Butter Cupcakes

1 can (15.5 oz) reduced-sodium black beans, drained and rinsed
4 eggs
1 tablespoon vanilla extract
5 tablespoons unsalted room temperature butter, or coconut oil
3/4 cup sugar
7 rounded tablespoons cocoa*
1 teaspoon baking powder
1/2 teaspoon baking soda
6 Reese's cups, each cut into 8 pieces

Directions:   

~Preheat oven to 350 degrees and line a 12-cup muffin pan.
~Blend the beans, 2 eggs, vanilla, and sugar in a food processor (or blender) until completely smooth.
~In a small bowl, combine the cocoa powder, baking powder and baking soda.
~In a large bowl, beat the butter until fluffy. Add the remaining two eggs one at a time and beat well after each. Beat in the bean mixture. Beat in the dry ingredients. 
~Pour the batter into muffin cups filling about 2/3 full.  Cut each Reese's cup into 8 pieces. (Cut them in the same fashion you would cut a pizza.) You should have 48 little chunks. Press 4 of those chunks down into the batter of each of the cupcakes.
~Bake for 20-25 minutes or until a toothpick comes out clean. 
 Peanut Butter Frosting
1/3 cup vegetable shortening
1/3 cup butter
3/4 cup peanut butter
1 tsp pure vanilla extract
4 cups confectioner's sugar, sifted
4-6 tablespoons milk
12 Reese's Minis, for decoration

Directions: 

~Using an electric mixer, cream shortening and butter. Add peanut butter and vanilla. Gradually add sugar, one cup at a time, beating well on medium speed. Scrape sides and bottom of bowl often. 

~If icing gets too dry and stiff to beat, add a tablespoon of milk. Once all sugar is incorporated, add the remaining milk if necessary then beat until fluffy, about one minute. (You don't want the icing too thin or it will not stand up on the cupcakes. Lift the beaters or paddle of your mixer and if the icing doesn't fall right away you are good to go.)

~Pipe or spread onto cupcakes and top with a Reese's Mini.


Happy Birthday, Tom! I hope you have a great day and an awesome weekend!

~~~~~~~~~~~~~~

*The original recipe calls for 5 tablespoons of cocoa. I found the batter was just not thick enough and the final cupcake could have more chocolate flavor. I played around a bit and found that 7 ROUNDED tablespoons worked great. It made for a thicker batter and a cupcake with the perfect amount of chocolate flavor. 

To get a rounded tablespoon, scoop out the cocoa without shaking or leveling off the excess. You should have a mound of cocoa in your measuring spoon.
Pin It!

Friday, May 25, 2012

Super Mario Brothers Cupcakes


I had so much fun making these cupcakes. This was my first experience with fondant and now that I have had a taste I can't wait to see what else I can do with it!

My friend Jessica mentioned that her son was having a Mario Brothers themed birthday so I made him cupcakes to match!. I LOVED Super Mario growing up. (Heck. Who didn't?) Needless to say, I had the theme song buzzing in my head most of the time I was making them.


I made chocolate cupcakes with chocolate buttercream. Using some blue and yellow Wilton fondant, I cut out some circles and stars.I used a food safe marker to draw on the eyes.


In addition, I made some flags out of images I printed from my computer.


I will post a tutorial on how to make these in the next week. They are so easy and add such a fun touch. Plus, as long as you can find the image, you can make a flag out of it!


And we can't forget Mario.


Donovan, I hope you have the best birthday ever!


Pin It!