Showing posts with label Cookies. Show all posts

Thursday, March 21, 2013

Easy Cake Mix Cookies


I love Reese's ANYTHING. Pieces, cups, mini cups, eggs, cereal (Have you had this? It rocks.), ice cream bars (These rock even more), Blizzards, you name it. If it has Reese's in the title I am likely to salivate profusely over it. As with any other sweet treat these days, I approach this love affair with much moderation. But let me tell you, it is super tough.

Recently on a walk, I saw an unopened Reese's egg just lying casually under a tree next to the sidewalk. I was sure there was an early Easter egg hunt of some sort going on, but no one was around. It crossed my mind that it would be so easy to take off with that little guy and treat myself in celebration of all my walking calories burned. But, I stayed strong and passed that sucker up for the sake of my rear end and thighs. Boy, was it hard. I am bound to believe that my arch nemesis strategically planted the egg there to bring me down.


Need a quick Reese's fix? These cookies are perfect. They are oh so delicious and pretty much the easiest cookies I have ever made!

Easy Cake Mix Cookies

1 -18.5 oz. devil's food cake mix*
3/4 cup chunky peanut butter
2 tbsp milk
2 large eggs
1 cup Reese's Pieces

-Preheat oven to 350. Combine cake mix, peanut butter, eggs and milk in a large mixing bowl. Beat at low speed until blended. Stir in Reese's Pieces. Drop dough by rounded tablespoons onto a greased cookie sheet. Press down a bit to flatten. Bake 7-9 minutes or until lightly browned. Once out of the oven, press down again to flatten a bit more.** Let rest about 5 minutes then remove to cooling racks.

~~~~~~~~~~~~~~~~~~~~~~~~~~~~~~~~~~~~~~~~~~~~~~~~~~
 
*We are getting jipped on cake mixes these days. Manufacturers have reduced the size of the mixes but we are paying the same price. Many run between 15.5 ounces and 16.25. The standard is 18.5 ounces. I have found that the store brand mixes have stayed true to this amount. And they are just as good.

**These cookies do not spread well on their own. The first batch I made came out baked in the exact shape they went in, round balls. That is why I flatten them before I put them in the oven and again right when they come out. This second time is not necessary, but I just like a flatter cookie. 

Pin It!

Wednesday, March 28, 2012

No-Bake Peanut Butter Cookies


Are No-Bake Cookies just a southern thing? I follow A LOT of baking and cooking blogs and I have never heard mention of them. I have seen variations such as corn flake cookies made with corn syrup, but not the straight up, good old fashioned oat variety that uses just butter, sugar and peanut butter. That's not to say they're just a regional thing. If you are not from the south and grew up with these cookies, let me know.  My curiosity is killing me.

My mom made these cookies for my siblings and I growing up. They were a once a week thing in our house and, oh, such a treat.  Sometimes she would make them on a Sunday evening and they really made Mondays a lot easier to face. We often argued over who got to lick the spoon and pan. 

These are my go-to for a sweet fix. I ALWAYS have the ingredients on hand to make them because they are all baking basics. And guess what? You just change a couple of ingredients to make a chocolate version. Mmmm.....chocolate..... 

Let's make No-Bake Cookies!

Melt the butter and add brown sugar and milk. Whisk together and bring to a rolling boil. 

Now this is where things get tricky. If you don't boil the mixture long enough your cookies will never set and you will end up eating them with a spoon. Which really is not much of a problem in my opinion. But, it does make it impossible to store the leftovers. You would have to eat every single cookie right then. Again, not a negative thing in my book. 

This is a rolling boil:


Once you see this, set your timer for 2 minutes. When the timer goes off, remove the pan from heat.

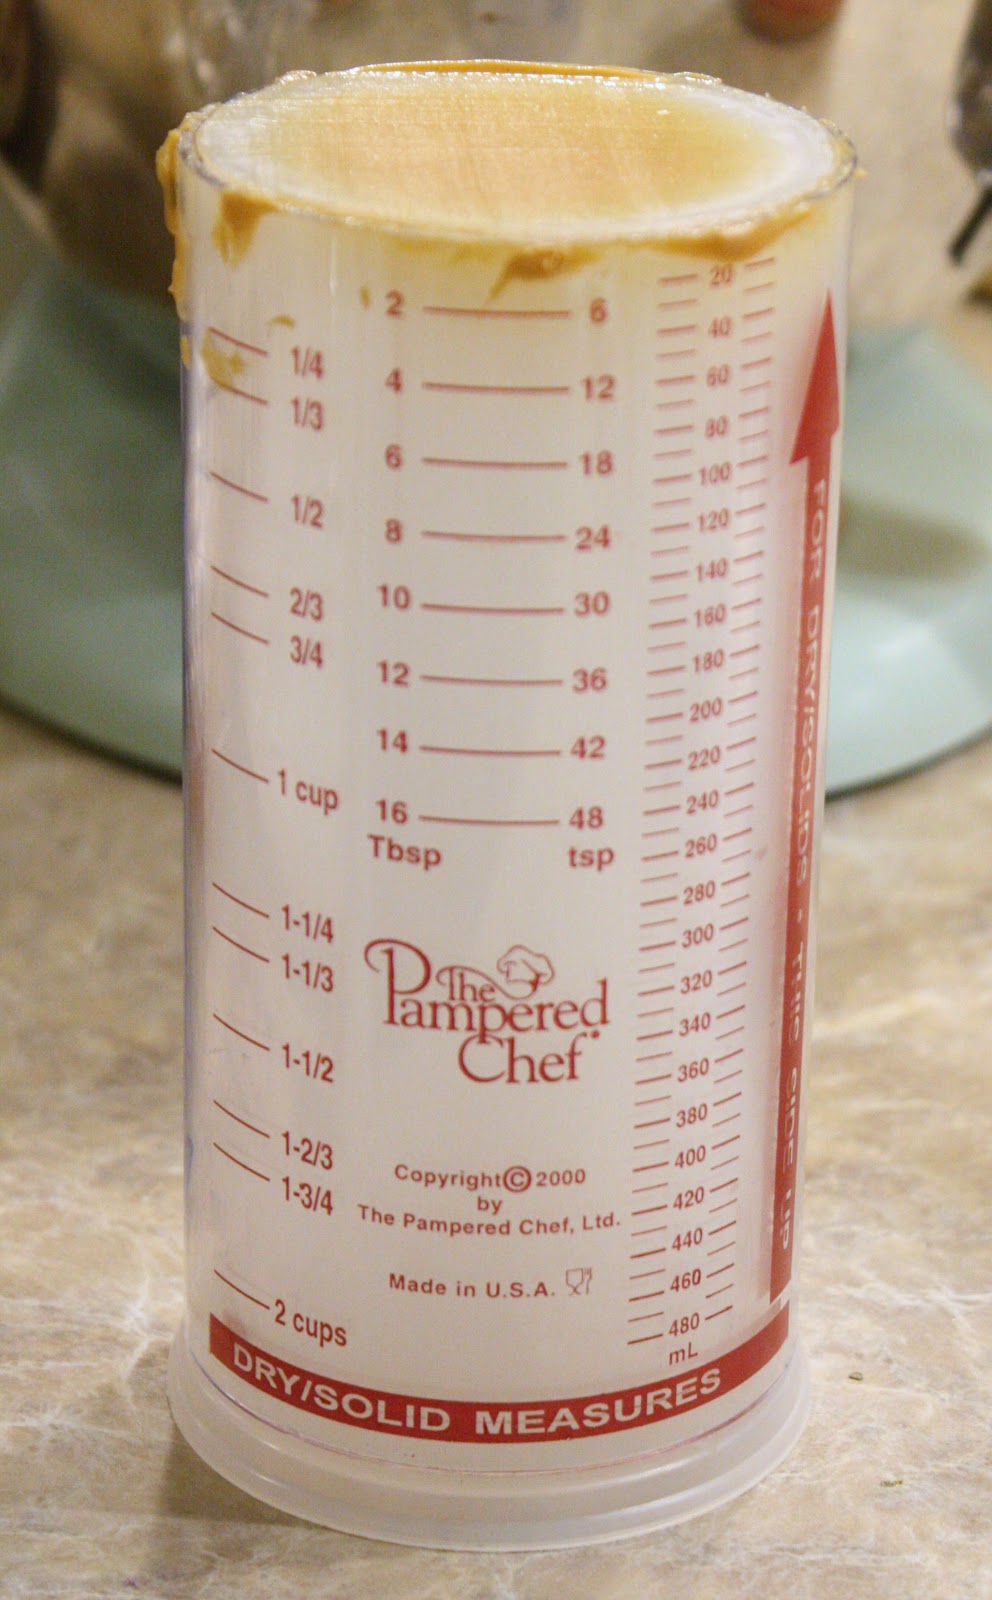
Next add your peanut butter and vanilla. If you don't have one of these, get it now.


Ever try to measure out peanut butter, or some other sticky substance using a measuring cup? It sucks. I can never get all of the ingredient out of the cup with ease. And baking, people, is all about science so if a recipe calls for a cup of something, by golly, you better have a cup and not a bit less. 

This gadget makes life so much easier. Set the cup to the amount you need, pop in the peanut butter (I use a butter knife so I can slide it across the edge of the cup and remove any excess) and press the bottom up to release the ingredients into your bowl or pan. Easy peasy!

And look how hardly any peanut butter is left! Mainly just the bit around the edges because I was messy. And I AM a messy baker. That's why you don't see many action shots. My kitchen gets too embarrassing during the process. If child services were to come into my house in the midst of my baking, there would be raised eyebrows. 


So, stir in your peanut butter and vanilla until they are well incorporated. Next, add your oats and stir well. Drop by the spoonful onto aluminium foil. Or in my case, because I was out of foil, wax paper. 


My mom always used foil and I see why. The warmth of the cookies and the condensation it caused on the bottom of the wax paper made made it stick to my table a bit. Use foil. Much easier. 

I added some chocolate sprinkles for fun. I love sprinkles. They make me happy. I would dip anything I could in chocolate and cover it with sprinkles. It's just the way things should be. But what's better than chocolate AND sprinkles? Why, chocolate sprinkles of course! And as we all know, chocolate and peanut butter are like total BFF's.


And the best part? I don't have to fight anyone for this:

This, folks, is what it's all about.

It's all mine. Come to Mama. And it did. One second after I sat down my camera.

Peanut Butter No-Bake Cookies
1 stick butter, melted
1/2 cup milk
2 cups packed brown sugar
1/2 cup peanut butter
1 tsp. vanilla
3 cups oats


1. Add milk and sugar to melted butter. Bring to a rolling boil and continue to boil for 2 minutes.
2. Remove from heat. Stir in peanut butter and vanilla. Once incorporated, stir in oats.    
3. Drop by the spoonful onto a sheet of foil and allow to set. 

Chocolate No-Bake Cookies
1 stick butter, melted
1/2 cup milk
2 cups white sugar
2 rounded tablespoons cocoa
1/2 cup peanut butter
1 tsp vanilla
3 cups oats


Follow the same directions as the peanut butter cookies, adding in the cocoa during the first step. 


Happy NO baking!

Pin It!

Thursday, March 22, 2012

White Chocolate Peanut Butter Grahams

I love things dipped in chocolate. And just about ANYTHING can be dipped in chocolate. Chocolate covered bacon, anyone?  It's all the rage these days. It's next on my list of items to dip. Right after my daughter's chubby little legs and bite sized toes. They're just begging to be nibbled.

This past weekend we threw a baby shower for my sister. There was a candy table that included a cake and all sorts of fun treats such as some S'mores Pops that I made. They are the perfect go-to celebration treat. For anyone who might have missed the post on how to make them click here.


I was so happy with the results! I used paper straws (from Amazon) for the sticks and pink candy pearls (from Michael's) for the embellishments. 

My mom is not big marshmallow fan so for her I just spread peanut butter between the crackers. They were fabulous! Of course, peanut butter and chocolate go way back. Throwing the graham cracker in the mix makes them certifiably addictive.


Once a month, we have a birthday celebration at work. Everyone brings some sort of treat in honor of all of the birthdays for that month and we just graze all day long. There's sandwiches, sweets, dips, fruit and more. I don't even bring lunch on these days because with all that food, there's pretty much no point.

For this month's celebration, it hit me that I had all the ingredients to make the stick-less version of the peanut butter graham pops I made for my mom. Instead of using the large square graham crackers, I broke them in half and made smaller rectangle sandwiches, dipped them in chocolate and topped them with bright sprinkles.


They are so delicious for something so simple. If you want your peanut butter sweeter or not as sweet, just adjust the amount of sugar you add. This recipe has a lot of wiggle room. You can't mess it up.

White Chocolate Peanut Butter Grahams

1/2 box graham crackers
1 tray of white melting chocolate/bark
1/2 C peanut butter
1/4 C confectioner's sugar
sprinkles

1. Break the graham crackers in half (or quarters, depending on how they are packaged) so that they are the smaller rectangle size.

2. Using a hand mixer, beat the peanut butter and sugar for a couple of minutes until it's smooth and a bit fluffy.

3. Spread the peanut butter mixture onto half of the crackers and top each one off with another cracker to form a sandwich.

4. Melt the chocolate according to the package. Dip the sandwiches and as you lay each one on wax paper top it with sprinkles while the chocolate is still wet. Allow about a half hour to set. 


Enjoy! But be careful. It's very hard to eat just one.

Pin It!

Friday, February 10, 2012

10 Cup Cookies

Copyright © To Bake or Not to Bake 2012

This isn't a very pretty cookie. It's flat, yet bumpy. It doesn't photograph well.  If you're going for looks, you'll have to search elsewhere. (It was a tough photo shoot. I kind of know how Nick Nolte's mug shot photographer felt.)

Now, if it's personality you're after, THIS is the cookie you want in your corner. It's chewy, full of flavor and I promise you can't eat just one.

Upon taking a bite, a priest once said, "Wow. I need to go to confessions after eating this." True Story. They are THAT good. 


A family friend gave this recipe to my mom years ago. It's very easy, it makes A LOT of cookies and they are always a hit. This cookie has never lets me down. 

10 Cup Cookies

1 Cup butter, softened
1 Cup flour *
1 Cup white sugar
1 Cup Brown sugar, packed
1 Cup Peanut Butter
1 Cup Chocolate Chips
1 Cup Raisins
1 Cup Walnuts
1 Cup coconut
1 Cup oats
1 tsp. baking soda
1/2 tsp baking powder
2 eggs

Cream together butter, sugars, peanut butter and eggs. 

Mix in flour, baking soda and powder. Incorporate remaining ingredients one at a time. 

Drop rounded tablespoons onto a non-stick or parchment lined cookie sheet. 

Bake at 350 for 11-13 minutes. 

Let the cookies rest for about 10 minutes before transferring from the cookies sheet as they are somewhat fragile until they cool. 

(Here's a secret: Yes, cookies are heaven right out of the oven and these are  tasty while still warm, but they are absolutely at their best the next day.)


Feel free to alter this recipe if you need to. If you can't have nuts or don't like coconut, just double one of the other ingredients or add a cup of something else. Be creative! (I once used toffee chips in place of the coconut and I often use dried cherries because I am not a huge raisin fan.)

*Since the flour is really just there to hold all the other ingredients together (not necessarily to give this cookie lift) you could easily get away with gluten free flour.

Enjoy!

Pin It!