Thursday, May 31, 2012

Pull Apart Pecan Sticky Rolls


I actually call these Christmas Sticky Buns. Since it is now unofficially summer, I thought I would forgo that title and just stick with something more descriptive and less out of season.

These became a tradition in our house two Christmas's ago after our daughter was born. (My plan is for her to never know a Christmas without them!) A coworker gave me the recipe and I am oh so grateful she did. I love the kind of breakfasts you prepare the night before. It makes for a much easier morning as I stagger around the kitchen searching for that first cup of coffee. Not to mention that these taste like something from a fancy bakery.

Have you heard of Monkey Bread? It's the same concept. The main difference is that the recipe calls for frozen yeast rolls instead of canned biscuits. Big difference in my opinion. Also, it uses a small box of cook and serve vanilla pudding mix. Are you intrigued yet?

The recipe that was given to me was not very exact. I have played around with it a few times and finally got what works for my bundt pan. Mine is not very large. Maybe 10 inches? But not to worry. I will give you tips so that you can make it work for whatever size pan you have on hand. Regardless, you can't really mess this recipe up as long as you don't over do it on the number of frozen rolls you use.

Pull Apart Pecan Sticky Rolls

12-18 frozen yeast rolls (golf ball sized)
1/2 - 3/4 cup chopped pecans
1 small box cook and serve vanilla pudding (I have been told butterscotch works great, too)
6-8 tablespoons melted butter
1/2 to 1 cup of brown sugar
cinnamon

Directions: 

-Spray bundt pan with cooking spray. Be sure to get every bit of the inside covered. This is important so that the rolls turn out of the pan with no issues. 

-Sprinkle in the chopped pecans. Lay the rolls in one layer. The rolls are not perfectly round and in fact are a bit flat. I tilt them up on their sides so that I can fit more in my pan. (My pan fits 12 rolls.) Be sure and fit only one layer of rolls. It may seem like there is way too much of the other ingredients in comparison to the small rolls, but trust me, these things rise a lot. 

-Sprinkle the pudding mix and brown sugar over the rolls. For my size pan I used 1/2 cup of brown sugar. If you have a larger pan that fits 16-18 rolls, you can use a cup of brown sugar. 

-Drizzle on the melted butter. Again, for my size pan I used 6 tablespoons. For a larger pan, use 8.

-Finally, sprinkle on cinnamon. The recipe I was given gave no amount. I use about a tablespoon.  If you love cinnamon, use more.

-Spray a sheet of aluminum foil and place it sprayed side down over the pan and secure. Allow rolls to rise overnight. (This is where the number of rolls is crucial. If you have more than one layer of rolls you risk the rolls rising to the point of pushing the foil off the pan and ending up on your counter or they won't bake thoroughly and will fall when you turn them out of the pan.)

-The next morning,  preheat the oven to 350 degrees. Bake the rolls covered for 15 minutes and uncovered for 10-15 or until done. Cool for 20 minutes, then turn out onto a dish and dig in!

 ~~~~~~~~~~~~~~~~~

These rolls are prefect for overnight guests. Heck, they are perfect for anytime. I made them this past weekend and they were a delectable Memorial Day breakfast. No one would ever guess they are so easy!


Pin It!

Wednesday, May 30, 2012

Not to Bake...


This has nothing to do with baking but I had to share.

My mom and I attended a baby shower last weekend and our gift was the Nap Nanny.  Have you seen this? My sister has one and loves it. Apparently, so do a lot of other people.  I am very much wanting one for my next baby.

Anyway, it was a large gift to wrap and we weren't sure how to go about it. My mom had the fabulous idea of using a disposable tablecloth! I just think that is genius. She found a blue one (the baby-to-be is a boy) for a buck at The Dollar Tree. Enough regular wrapping paper to cover it would have cost at least 4 times that.


And how cute would this tablecloth be wrapped around a Father's Day gift of grilling paraphernalia?

I just love this idea and will be using myself in the future!

Pin It!

Sunday, May 27, 2012

Best Ever Chocolate Sauce


Note to self:

Do not attempt an ice cream photo shoot on the hottest day of the year so far. In your kitchen. While the oven is slow cooking a chicken.

Sincerely, 
Me

Even though the air is on in my house, this was a tricky shoot. Things were melting and sliding (quickly, at that) and not making for pretty pictures. 

The whipped cream refused to cooperate even a little so I scrapped it. The ice cream itself, a key part in the whole gig, almost didn't make it through. I felt like a director whose actors kept walking off the set.


This, my friends, is the BEST CHOCOLATE SAUCE IN THE WORLD. For real. It will knock your socks off. And it's so super simple. The hardest part is the waiting. (Tom Petty couldn't have been more right about that one.) 

This amazing recipe came from my mom and though she has made this many times in my life, I was reintroduced to it a few weeks ago. It's a dangerous recipe to have in your arsenal when your favorite sweet treat is ice cream. 

Trust me on this: Take a bowl of simple vanilla or chocolate ice cream, top it with a bit of this heavenly delight and the result is pure magic. No other toppings needed. 

Best Ever Chocolate Sauce

2 cups granulated sugar
3/4 cup cocoa
1 1/4 cups water
1/2 teaspoon salt
1 teaspoon vanilla

Directions:

-In a sauce pan, whisk together sugar, cocoa, water and salt. Stirring occasionally, bring to a rolling boil then immediately remove from heat. (This mixture tends to boil over very quickly so stay with it. Once it reaches the rolling boil, get it off the heat to avoid a mess.)

-Allow to cool about an hour or two, then put back on stove top and bring to a rolling boil once more. Remove from heat, stir in the vanilla and then allow it to cool about an hour in order to thicken a bit.  (It will thicken even more once you store it in the refrigerator.) 


I hope you have a relaxing Memorial Day!
Don't forget to remember those who made all our freedoms possible.

Pin It!

Friday, May 25, 2012

Super Mario Brothers Cupcakes


I had so much fun making these cupcakes. This was my first experience with fondant and now that I have had a taste I can't wait to see what else I can do with it!

My friend Jessica mentioned that her son was having a Mario Brothers themed birthday so I made him cupcakes to match!. I LOVED Super Mario growing up. (Heck. Who didn't?) Needless to say, I had the theme song buzzing in my head most of the time I was making them.


I made chocolate cupcakes with chocolate buttercream. Using some blue and yellow Wilton fondant, I cut out some circles and stars.I used a food safe marker to draw on the eyes.


In addition, I made some flags out of images I printed from my computer.


I will post a tutorial on how to make these in the next week. They are so easy and add such a fun touch. Plus, as long as you can find the image, you can make a flag out of it!


And we can't forget Mario.


Donovan, I hope you have the best birthday ever!


Pin It!

Wednesday, May 23, 2012

Dark Chocolate Peanut Butter Brownies


There are some small things in my simple life that make the world go 'round.

That first cup of morning coffee with my favorite creamer.

A warm and comfy bed at the end of a long day.

Getting the latest edition of a magazine delivered to my Nook.

Zombies.

You read right. I said zombies.

The Walking Dead on AMC is one of my favorite shows and, to me, every new episode is like Christmas morning! If you are not watching it, you should be. It is one of the best shows on TV right now. Between it, Dexter and American Horror Story I am a happy woman come fall. 

It's funny because I am not a blood and gore type person. And I loathe horror movies. Jason, Freddy, that wacked out pale face from Scream, they scare the bejeezus out of me. This show is pretty stinking bloody. (As are the other two shows I mentioned, but I'll explain my love for them some other time.) For some reason I am intrigued by the whole zombie thing. As far as I am concerned, a zombie apocalypse isn't happening in my lifetime so maybe that makes the idea less threatening. Yes, the show makes me jump and if I watch it before I go to bed it's inevitable that I will dream I am running from zombies all night. But it's SO worth it.

It comes on at 10 so I DVR it and watch it during the day to avoid those zombie dreams. When the first season was on, I could watch it with Baby Mac sound asleep in her bouncy seat. Well, now that she is more than aware of TV, watching it during the day has become a pipe dream. That means this last season's episodes have piled up on my DVR. Monday night, I couldn't stand it any longer. I bit the zombie bullet and got caught up. What a ride! I was exhausted when it was all over. The twists and turns are just so incredibly fun! And I CANNOT wait until the season starts up again in the fall.

I knew what I was getting into so it did not surprise me that I had one of the last shocking images from the finale burned into my brain as I laid in bed. I forced myself to think of something else, and that something became baking. One thing led to another and some leftover peanut butter icing I had in the fridge made it's way onto some dark, fudgy brownies. The following night, I made that fantasy recipe a reality. (And by the way, those forced thoughts of baking saved me from zombies that night.)

Ah, peanut butter and chocolate. A few more small pleasures in life. 


Dark Chocolate Peanut Butter Brownies

1 box Duncan Hines Dark Chocolate Brownie mix (family size), prepared to batter
3/4 cup dark chocolate chips
1/4 cup vegetable shortening
1/4 cup butter
1/2 cup peanut butter (or more to taste)
1/2 tsp vanilla
2 cups powdered sugar
2-4 tablespoons milk


Directions:

-Stir chocolate chips into brownie mixture. Pour into a greased 9 x 13 pan and bake according to box directions.

-Meanwhile, beat shortening, butter and peanut butter with electric mixer until creamy. Add vanilla. Add powdered sugar one cup at a time. Add milk 1 tablespoon at a time if frosting becomes to thick to mix. Taste frosting and add more peanut butter if necessary. (I added a few more tablespoons so that the frosting had more of a peanut butter fudge taste.)

-Spread frosting onto brownies as soon as they come out of the oven and allow them to cool completely before cutting.

~~~~~~~~~~~~~~~~~~

What small things in life give you joy?

Pin It!

Monday, May 21, 2012

Puff Pastry Fail

Don't be fooled by all the pretty pictures here at To Bake or Not to Bake. Things don't always go smoothly in my kitchen. My kitchen is pretty much Food Experimentation Central. And it's the nature of the beast that experiments fail. 

Sometimes I get these crazy ideas in my head that I MUST try and I believe what I am about to attempt will be the simplest and best recipe ever. Oh, how naive I can be. 


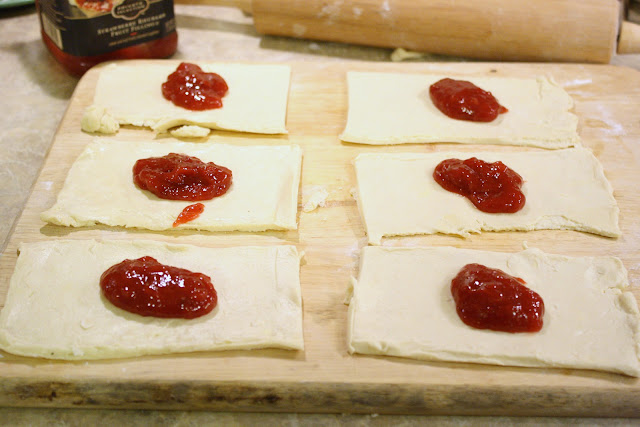
I mentioned the filling above in my Mother's Day post. It's fantastic and since I had some leftover I was itching to create something with it. I decided to try some turnovers using puff pastry sheets. Two ingredients. Bam! "This will be so easy," I thought. (I am laughing at myself. Again.)


I bought some Pepperidge Farm puff pastry sheets. There are two in a box. Since I thought the dough seemed kind of thick, I thinned the first one out with my rolling pin. I wanted to make symmetrical turnovers but the edges weren't close to even so I just folded the dough over a few times and tried it again. Still crooked. That's ok, I thought. I'll just make cute little purses out of them! They will be adorable! I spooned some of the Strawberry Rhubarb filling onto each one....


...and sealed them up into dainty little bags. I brushed them with egg wash and put them in the oven.


And they turned out like this:


I can't even bring myself to make that picture bigger because it makes me sad. 

They came out of the oven pathetic, flat, lifeless patties with cracks. They oozed the delectable filling that was supposed to stay locked inside. They didn't taste much better. Though I cooked them longer than the box called for, they were doughy and tasteless, but for the filling. 

Then I realized, I cooked them at 350 not 400 like I was supposed to. D'oh! Or should I say, Dough!

Since there was another sheet of the dough, I got back on the horse and made another attempt.

This time I didn't roll the dough with a rolling pin. I just unfolded it, cut it into six squares and spooned in the filling.


I changed it up a bit and made pouches....


...And crimped the edges with a fork.


THIS time I baked them at 400 and they turned out better. I topped them with a simple powdered sugar glaze. (1 Cup powdered sugar, 1 tablespoon of milk and 1/4 tsp vanilla)


So this was my first time with puff pastry and to be honest, I was not a big fan. I think going into this I had phyllo dough in my head so I was expecting super flaky results. The dough didn't "puff" at all, as it's name suggests. It was ready-made dough, after all. Maybe if I make my own it would turn out better. I plan on researching puff pastry to see what went wrong and find out what makes for great dough.

We can never learn if we don't make mistakes. So let's embrace our cooking disasters! As long as EVERY experiment isn't disastrous, I'll take 'em.


Pin It!

Saturday, May 19, 2012

In a Few Days...

I have had a super busy last couple of weeks. I am going to take this weekend to relax and not do much at all. I will be back. And when I am, I will fill you in on how these turned out. 


Have a great weekend!

Pin It!

Thursday, May 17, 2012

How to Pipe Carrots


I believe in cake mix.

I believe in store bought icing.

I believe in short cuts, as long as they don't skimp on taste or quality.

Some bakers would consider these statements blasphemy. That if you don't make a cake or icing from scratch you are breaking some kind of unspoken baker's code. 

I almost always use cake mixes. And every now and then, if a project doesn't call for a sturdy icing*, I use store bought. I work full time and have a toddler and husband to take care of, so some days I don't have time to make something totally from scratch. (I am sure you can relate.) It doesn't make the baking any less special. It still comes from the heart and it still has homemade touches. And I get just as many oooo's and ahhhh's in the end.

A friend of mine had a very special birthday and when I asked what kind of cake he would like, he requested carrot in a simple sheet form. I used Duncan Hines Decadent Classic Carrot Cake Mix.  It's not your normal bland carrot cake boxed mix. It comes with actual shredded carrots and raisins. It's most excellent.

Store bought icing can be a little thin, but for a sheet cake it works great. We all know cream cheese icing and carrot cake go together like Kathy Lee and Hoda. I am a fan of Pillsbury cream cheese icing. In fact, when I buy icing it's usually the one I choose. I have even had people request it saying, "Remember that cream cheese icing you used that time? I want that kind." (Take that, baker's code.)

Here's a trick when using store bought icing: whip it with an electric mixer for about a minute. It adds air to the icing which lightens it up, plus it almost doubles what you start with. It's a win win.

Since the cake and icing did not take as long as my usual endeavors, I wanted to do a bit of decorating. I had a carrot cupcake from Caramanda's a while back and there was a tiny carrot piped onto the top of it. It was adorable. I decided to try it out on this cake. 

I used two containers of icing for this cake, but reserved about a fourth of it for decorating. I tinted half of that reserved icing orange and the other half green.  I put a Wilton 67 leaf tip on the bag of green icing and a 12 tip on the orange. 

Wilton 67 Leaf Tip

Wilton 12 Round Tip

Let me preface all of this by saying, it is TREMENDOUSLY hard to photograph with one hand and pipe with the other. That is why there are not photographs of the whole process in action, AND why the pictures are not the best quality. My next step is to get a tripod and figure out the timer on my camera. I have a whole new appreciation for all my favorite food bloggers after this. You gals must have a third hand you're keeping under wraps.

So first, take the leaf tip and hold it at a 45 degree angle. Squeeze pretty hard and drag slowly so that you get a wide section of icing. Then, slow down the pressure to almost nothing and pull so that the icing forms into a point at the bottom.


Next, using the orange icing with the round tip, place the tip directly over the bottom pointed end of the leaf you just made. Again, apply a good amount of pressure and drag.


Once you get about that much orange icing, slow the pressure to almost nothing and slowly pull away to form the pointed end of the carrot.


It's that easy!! And what a cute addition to a carrot cake.

I piped that carrot at the wrong end of the leafy greens. The other carrots better not make fun of him.

Anyone on the receiving end of baked goods is going to feel extra special. He or she is not thinking about whether it took you 3 hours or  45 minutes to make that gift of food. They are simply thrilled that they were thought enough of for someone to go out of their way to cook for them. It really is the thought that counts. When you take the time to mix a batter, bake it and cover it with icing, you are telling someone that they are important and special to you. Ya know, cooking for others just may be the answer to world peace.

~~~~~~~~~~~~~~~~~

*Because store bought icing is a bit on the creamier side, I usually make my own icing for cupcakes or goods where the icing needs to stand up and stay in place. However, I have had luck with pre-made icing for frosting cupcakes by mixing in some powdered sugar to stiffen up the icing a bit.

Pin It!

Monday, May 14, 2012

Can't Do Without...


I love this gadget.

Seriously. Love it.

Remember when you were little and kids would say, "If you love it so much why don't you marry it?"

It's that kind of love.

This is the Oxo Good Grips Food Scale. I use so much more than I originally thought I would.

I initially bought it to measure precise portions for more accurate calorie counting, but it has since come in handy for tons of other jobs.

I buy meat in bulk so it's perfect for dividing it up before freezing. 

I buy butter for baking in 8 ounce blocks so when a recipe calls for two sticks I just weigh out 8 ounces. 

I use it for measuring flour and sugar when the recipe calls for an increment in weight rather than volume. 

I even use it when I am making burgers to make sure each one weighs exactly the same as the others for  more even cooking. 

In addition, I use it to measure out batter when I am making a layer cake. If all three cake pans have the same amount of batter, that means they are all baked to perfection at the same time AND they're all the same size.

I could go on all day listing the many jobs I have used it for. 

This gadget makes the perfectionist in me as giddy as a school girl.

And what's really great about this bad boy is...


...the display slides out for easy reading. That means if I am using a large bowl that sits too far over the display, I simply pull it into my view. And, when using a bowl or plate to measure your ingredients, you can zero out the scale so it doesn't count the weight of the dish. 

Pretty cool, huh?

I can say without hesitation this is one kitchen tool I can't do without!

~~~~~~~~~~~~~~~~~~~~~~~~

*All opinions on "Can't Do Without" are 100% mine and are not influenced by outside sources. I feature products I have a legitimate love for and that have truly made my life easier!*


Pin It!

Sunday, May 13, 2012

Happy Mother's Day!


Happy Mother's Day to all the Mom's out there! I hope you have a fabulous day and get spoiled to the max!    (Who's for bringing back "to the max?" Anyone?...No?... Yeah, it wasn't one of the best phrases to come out of the 80's. I prefer "gag me with a credit card and put me on layaway.")     

Baby Mac spent the night with her grandparents Friday night. Since I didn't wake up to my normal Mommy routine yesterday, I got an ambitious streak and decided to make cakes for some special women in my life as Mother's Day gifts. 

Because I am still learning, each time I bake I like to try something new. I had recently bought some 6 inch pans (so far I have only used 8 inch) and decided to break those out and make some smaller cakes. 


My mom really liked the ruffle cake I made earlier in the week. I wanted to replicate that style, but decided to try a different method. Instead of piping in a vertical fashion I piped horizontally. I still started at the bottom, but went around the cake in layers of ruffles instead of straight up in rows. Here is a video that shows the technique. 


I tried something else new this time around. A filling. I have used strawberries before but I really wanted to go with a curd type filling this time.  I found a strawberry rhubarb fruit filling at Kroger and it sounded delicious. And as it turned out, it WAS delicious.

It's so simple to fill a cake. Simply pipe a dam of frosting around the edge of the cake layer and spread the filling in the middle. The dam keeps the filling from seeping to the outside of the cake once it's frosted. 

That black spot is a strawberry, I swear. It's shape is very unfortunate and it scared me, too, at first.

I am all about taking advantage of ready made ingredients. There is something to be said for totally homemade food. However, when I come across something that helps me get done quicker, I go for and don't blink an eye. After all, the finished product is still homemade.

Also, between the cost for the ingredients and the time it would have taken me to make it, this filling was a steal at $4.89! (It was a Private Selection item. Have you tried Private Selection? So far I have never been disappointed with a single product.)


I recently ordered a bunch of gum paste flowers from Wholesale Sugar Flowers including the one above. I thought they added a nice touch to the cakes. They have such a fun site. If you are a baking geek like me you'll enjoy it. 


My next goal is to talk one of the recipients of these cakes into giving up a slice to this mom.

Happy Mother's Day, everyone!

Pin It!

Friday, May 11, 2012

Something Blue...


I was bestowed the glorious honor of making a wedding cake and cupcakes for my friend Tracy. I was thrilled when she asked and my head was swimming with ideas.

She and Jody met at a University of Kentucky basketball game in New York. They are both from Kentucky. It makes for such a sweet "how they met" story being that they first laid eyes on each other in a whole other state.

For that reason, the bride wanted to go with a blue themed cake and cupcakes. My mind immediately went back to the gorgeous blue ombre petal cake made by The Hungry Housewife. Her tutorial was the one I used for my brother's birthday cake last month. Can I say again how FABULOUS she is? (I was singing the word "fabulous" right then just to emphasize the magnitude of her fabulousness.)


The technique is not hard, it just takes some time and patience. Making and tinting the different shades of icing took the most time. The decorating itself didn't take as long, but I was careful to take my time and not get ahead of myself. Once I got into a grove, it flowed pretty smoothly.


Though this technique has been around for a while, Leslie's tutorial made it doable for me. (Thank you, Leslie! I would have never tried this technique if it weren't for you!)


The bride also wanted blue cupcakes with white sugar pearls. I took the extra step and added some gum paste flowers.


The cake and icing are almond flavored. I used LorAnn Baking Emulsion for this. Emulsions work great because they don't bake off like regular flavorings tend to do. The flavoring is more concentrated. I found this flavor and some others at Hobby Lobby.


Congratulations, Tracy and Jody! I am so happy for you! You have such a wonderful and exciting road ahead of you!


Pin It!

Wednesday, May 9, 2012

Ruffled Lemon Cake


Some of my best writing comes to me at night while I am in bed. This is not a good thing because it usually occurs when I am in the comfort zone. 

Baby Mac is finally asleep.

I have my pillow fluffed just right.

The proper number of blanket layers has been determined and the extras have been removed or added.

I have established the optimum positioning for nice, cozy sleeping throughout the night.

I start thinking about the day. If I baked and took photographs of the goods, the pictures are floating through my head. Soon the wheels start turning and I have written the first paragraph of a post. I had no intentions of doing so, the words just come to me. And I am very happy with it.

Now, the responsible writer would grab her notebook and pen (that are literally 12 inches away from my head on the bed table) and jot down the words before they are lost. But not this gal. I am sealed into a relaxed, snug and contented wrap that took a while to get right and I simply cannot will myself to undo it all. So, I just keep repeating the paragraph over and over in my head thinking, "Oh, this is just too good. There is no way I will forget this by morning!"

And yet, here we are.

No funny, clever introduction about a ruffle-decorated cake. Just, well, a ruffle-decorated cake. But trust me on this one. Whatever that paragraph was, it was brilliant, entertaining, hilarious and free of spelling errors.


My dear co-worker Tracy is leaving us for her man and Florida. She and her fiance will marry this week and move to Florida the next. AND she just finished up her MBA! She has lots to be thrilled about and everyone in the office is extremely happy for her!

But we will miss her greatly! She always has a smile on her face and never a negative word to say. She is the type of person anyone would adore having around.

Tuesday we had a going away lunch for her and I made a lemon cake for the occasion, decorated in a ruffled effect. I have always wanted to try this style and, thanks to You Tube, I made it happen.


Rather than give you my own tutorial, I am going to stick with my usual "if it ain't broke don't fix it" mentality and direct you here. The video is short and simple. All you need is a Wilton 104 petal tip, a pastry bag, a cake and some icing and you're good to go.


It really is such an easy technique. It does take some time and a bit of patience, but the process is not difficult. And the results are are fantastic.


Congratulations, Tracy! I am incredibly happy for you and know that lots of good things will come your way!

Pin It!