Monday, April 30, 2012

Orange Creamsicle Cake


There were many occupational hazards during this photo shoot.

Lots of orange juice along with excess frosting and crumbs that had to be removed from the plate. And the clean cut on the edge of that slice of cake? It didn't happen by accident. I cleaned up the edge with that fork, and then cleaned off the fork with my mouth. Hey, I had a camera in one hand and an excited toddler pulling on the other. I had to think quick on my feet. All in all, I think I consumed about 400 calories just trying to get the shots to my liking. It's a tough, tasty job. 

My brother Patrick had requested a while back that I make an orange creamsicle cake while he was in town. One of his friends made it some years back and he's had it on his mind since. I had never heard of it so I used my best friend Google to see what I could find. 

I found tons of versions and while they differed from recipe to recipe the premise was pretty much the same: pouring liquid orange gelatin over a baked cake then frosting it with a mixture of whipped topping, vanilla pudding and another box of orange jello. 

Some recipes used yellow cake, some used orange. One recipe used cream cheese while most did not. Almost all of the recipes called for the cake to be baked in sheet form. 

I didn't really follow one single recipe. I took elements from every version I came across and went for it.

Also, I am a layer cake kind of girl these days so I went that route. I used one orange boxed cake mix and divided it evenly between three 8 inch pans. I left the cake in the pans to cool and divided the liquid jello between them.

This cake truly tastes like an orange creamsicle. My husband took a bite and said, "Wow, it tastes just like a Flintstones Push Pop!" (Remember those? I love the way he thinks.)


Orange Creamsicle Cake 

1 (18 oz) box orange cake mix, prepared 
1 (3.5 oz) box orange gelatin*
1/2 cup boiling water*
1/2 cup cold water*

Frosting
8 oz cream cheese, softened**
1 (3.5 oz) box instant vanilla pudding
1 (3.5 oz) orange gelatin
1 cup milk
1 tsp vanilla
8 oz tub whipped topping, thawed

-Poke holes in the prepared cake. (If you are making a layer cake, leave the layers in the pans for this step.) Stir boiling water into gelatin and mix until dissolved. Add cold water and stir to incorporate. Pour liquid gelatin evenly over cake. Refrigerate for at least an hour.

-Beat cream cheese until smooth. Add gelatin mix, pudding mix, milk and vanilla and mix well. Fold in whipped topping. Spread onto cake and chill until ready to serve. 


~~~~~~~~~~~~~~~~~~~~~~~~~~~
I noticed later that every single recipe called for a 6 oz box of gelatin in this step. A 6 oz box would in fact make for a more flavorful and moist cake. If you use that size, maybe up each of the waters to 3/4 cup.

**Most recipes did not call for cream cheese. I am a cream cheese lover but if you are not a fan it is more than fine to leave it out.

Pin It!

Saturday, April 28, 2012

Can't Do Without


Meet the SideSwipe Spatula Mixer Blade. This handy gadget is my new best friend. For anyone out there with a Kitchen Aid mixer, I highly recommend you hook yourself up with one of these bad boys. 

When mixing with the regular paddle blade, I always have to stop and scrape down the sides and around the bottom of the bowl to ensure everything gets incorporated well. There is always some dry ingredient of some sort down there just waiting to get in on the action.

With the SideSwipe, those days are no more. The SideSwipe blade is coated in rubber fins that scrape the sides and bottom of the bowl as it mixes. That means better mixing and shorter mixing times. I tried it the other night and it was fantastic! I didn't have to scrape the bowl once and everything mixed up better than before. My mixer is now even more independent than ever!

Amazon has it for 20 bucks and it's a great investment if you ask me. Consider it time saved in the kitchen!

Pin It!

Thursday, April 26, 2012

It's a Girl! (Gluten-Free Cupcakes)


I am an aunt! Baby Mac has a cousin! 


My sister rocked at child birth. She and her husband were absolutely beaming! They will be fabulous parents to Elizabeth Ruth! I am going to squeeze that baby like mad when I get my hands on her. (I didn't get to hold Elizabeth yesterday so when I get to her, it's on!)

Babies are just about the greatest thing on earth, aren't they? I mean, the fact that a woman can grow a human IN HER BELLY, and then the love that radiates from all around when that little person enters this world, is just phenomenal. Nothing compares to it. 

I made some cupcakes to take to the hospital for the parents to have on hand in case my sister is like I was after childbirth and  in desperate need of something sweet. My brother-in-law has Celiac Disease so I used a gluten free recipe I have had in my arsenal for quite some time but had yet to try. I found the recipe on the fun site With Sprinkles on Top  but it originated at Chocolate and Carrots

Gluten-free recipes use gluten-free flour. Gluten is what makes baked goods, well, good. So needless to say, my sister has a hard time finding recipes that work in this area because she says the GF flour makes for a very dense and tasteless end result. 


This recipe remedies that. And you would not believe how: black beans. Yep. I said black beans. Instead of flour, they are pureed and mixed in with the rest of the ingredients. You would never know! The chocolate pairs very well with them and takes over in the taste department. And somehow, I don't know the science behind it, they fill in perfectly for the flour. (I am guessing they make up for the lacking protein due to the missing flour.) They make for a moist and flavorful cake.


Baby Mac and Mr. Mac tried them sans icing and they were none the wiser. 


I topped these with a swirl of chocolate and pink buttercream icing. 


Chocolate Gluten-Free Cupcakes

1 can (15.5 oz) reduced-sodium black beans, drained and rinsed
4 eggs
1 Tablespoon vanilla extract
5 Tablespoons unsalted butter, or coconut oil
3/4 cup sugar
5 Tablespoons special dark cocoa powder
1 teaspoon baking powder
1/2 teaspoon baking soda
1. Preheat oven to 350F and line a 12-cup muffin pan.
2. Blend the beans, 2 eggs, vanilla, and sugar in a food processor (or blender) until completely blended.
3. In a small bowl combine the cocoa powder, baking powder, and baking soda.
4. In a large bowl, beat the butter until fluffy. Add the remaining two eggs and beat well after each. Beat in the bean mixture. Beat in the dry ingredients.
5. Pour the batter into muffin cups. Bake for 20-25 minutes or until a toothpick comes out clean. 

My sister said that these cupcakes are much better than their regular gluten-free counterparts. "Richer and moist" and "You can't even tell there is anything but sweet stuff in there!" And her husband said he "LOVED" them.
If you or someone you know has a gluten allergy, you MUST try these cupcakes! You will make their day!
Pin It!

Monday, April 23, 2012

Treat Yo Self to a Petal Cake


My brother Patrick is coming into town! I can't wait to see him. He lives in Aspen, Colorado and makes it in to see us about twice a year. He is so witty and entertaining. As soon as Baby Mac sees him she starts giggling because she knows there is fun to be had.

Today is his birthday! While Baby Mac and I were at my parents' house this weekend, I made a special cake that will be waiting on him when he gets into town tomorrow. Isn't it fun?! You are not going to believe how simple this petal technique is!

One of my MOST favorite food bloggers, The Hungry Housewife, posted a tutorial on this petal technique a few weeks ago and I have been dying to try it. (By the way, check her out. She is super fun and oh so clever. And her video tutorial kicks the butt of the one I am doing here.) Her cake was done in a blue ombre fashion and turned out GORGEOUS. I am hoping to make that version for a friend of mine in a couple weeks, so I was thrilled to get to practice on my brother's cake.

Here's how it's done. First, crumb coat your cake.


Normally with a crumb coat you just put a thin layer all over the cake not worrying if it doesn't look "finished." And typically with a petal cake, you continue the pattern all over the top of the cake which hides the crumb coat. But because I wanted to write on this cake, I took time with the top of it making sure it was smooth and presentable. If you are going to cover the top of your cake with petals, you don't have to worry about the first coat of icing looking pretty.

Next, using a #12 piping tip, pipe a line of vertical dots about the size of a quarter.


With a small offset spatula, or the back of a spoon (which is what I used), press into the right side of the dots and drag sideways. 


Pipe another row of dots, drag them, and repeat all the way around the cake.


Until you end up with this!


To finish the cake, pipe one last row of dots and just don't drag them. This is the back of the cake and will not be very noticeable. 

For the top, just pipe and drag the dots in a circle. You can see more detail of this on The Hungry Housewife's cake. Again, because I wanted to write on this cake, I just did one circle of dots on the top.

And because my brother and I are huge fans of Parks and Recreation (Ron Swanson is our hero) I did this:


A couple of the characters on the show have an annual "Treat Yo Self Day." Do "yo self" a favor. Click on this link. You will laugh. And who couldn't use a good Monday laugh?


Happy Birthday to my sweet, sweet brother! We can't wait to see you!

Pin It!

Friday, April 20, 2012

Spa Day


Sonia, the daughter of a coworker, has a birthday today. She and her friends are celebrating with a "spa" day. Sonia's mom is treating them all to mani/pedis! 

In honor of Sonia's special day I made mini cupcakes in her favorite colors: Pink, purple and green. I tinted the cake batter pink, made green buttercream icing and once again used the drop flower technique to create the purple and yellow flower embellishments. 


I know I have mentioned before that I'm not a big cupcake person and don't divulge in my baked goods much, but these little babies are pretty irresistible. They are small and poppable and have JUST enough icing without being overly sweet. I just might have to add these to my kryptonite list.


I hope you have a fabulous birthday, Sonia!


Pin It!

Tuesday, April 17, 2012

Royal Icing Drop Flowers


Are you watching Smash on NBC? I am hooked. I started watching it simply to see how Katharine McPhee would fair as an actress and it turns out she's part of a pretty fabulous cast and story line. I was simply expecting it to be another Glee of sorts, but it's really a show all its own. It's one of my new favorites and I will be crushed if it doesn't get renewed for a second season. If it gets cancelled, it's gonna be Mercy for me all over again. I'm still not over that one, NBC.

What does Smash have to do with royal icing flowers or cupcakes? Not a thing. I have been stuck in the house for three days with a very sick little Baby Mac and I just needed some adult conversation. Ah...feels good to talk about a TV show other than Caillou. My poor baby has been so sick, we have done nothing but sit in the recliner and watch Caillou constantly. 

It's getting to the point where I just dissect the show now. 

Today, Caillou opened his dresser to pick out a shirt for the day. Guess what? He picked the one he wears EVERY SINGLE DAY. 

And Rosie's laugh is starting to get to me. She is supposed to be what? Maybe a year and a half old? Her vocabulary is just way to broad for her age and when she laughs she sounds like a 10 year old. 

Why is Caillou bald? This is never addressed. Should we be worried for him?

And Mommy never carries a purse or a diaper bag. But her clothes are super baggy so maybe she has a cargo pants/shirt thing going on. In fact, her look has had me questioning whether Caillou has another sibling on the way. Mommy and Daddy are pretty affectionate so who knows?

Needless to say, I have been dying to bake and decorate something. The next things on my list to try were royal icing and drop flowers so last night after Baby Mac was in bed I decided to give it a shot.


Royal icing is very simple ingredient-wise. It is made with egg whites or meringue powder, water and powdered sugar. I used meringue powder since it's easier than separating eggs and safer than raw eggs. Plus, it keeps in the pantry for a while. You can find it at Michael's, Hobby Lobby, Amazon or even Wal-Mart in their craft section. 

Royal icing hardens so it is great for flowers. You can make a bunch of them, let them dry overnight and then keep them in an airtight container until you are ready to use them.

The trick with royal icing is you have to mix it to just the right consistency in order for it to do its thing. Bridget at Bake at 350 has a great tutorial for royal icing. It includes pictures that help you to know when your icing has reached that perfect texture. Her recipe calls for corn syrup, but don't worry if you don't have any. Because she uses her icing for cookie decorating, it helps if the icing has a little shine and the corn syrup does just that. For drop flowers, it's not really needed.


Drop flowers are simple embellishments but they add such a delicate touch. I scour You Tube for instructional videos on cake decorating and this video is a great short and sweet tutorial on how to make drop flowers. Just pipe the flowers onto wax paper, use a different color for the dot in the middle and let them dry. It takes hardly any time to make them. 


The last thing I want to tell you about are these beautiful StayBrite cupcake papers by Reynolds. They don't fade once they are baked in the oven like most liners. They are a bit expensive ($3.59 for 36 of them), but I have tried a few other "grease-proof" liners that I ordered online and had no success with them. They either didn't hold their shape or they peeled away from the cakes. The Reynolds liners performed perfectly and the packaging even says you can use them on a cookie sheet instead of a muffin tin because they hold their shape so well. The only downside is that the selection of patterns is very limited. I would love to see them in solid colors. 


So, to sum up:

1. Check out Bridget's royal icing tutorial here

2. See the video tutorial on drop flowers here

3. Find Reynolds StayBrite Baking cups at your local grocery. 

Happy Decorating!

Pin It!

Saturday, April 14, 2012

Monster Brownies


I had all these plans of grandeur for the weekend. They mostly included getting organized and caught up on some chores, but there were a few baking experiments sprinkled in there, too. I got off work at noon yesterday so I had a big head start. The result was going to be a feeling of great accomplishment and preparedness for the week ahead as I tucked myself into bed Sunday night. Ah, the feeling of a weekend full of productivity!

I kissed all of that goodbye about 1:00 yesterday. After I picked up Baby Mac from the sitter, I started feeling pretty crappy. Headache, congestion...you know, all that crazy fun stuff us moms just long for on our days off! I napped while she napped, then put Caillou on repeat once she woke up and settled myself onto the couch. Afternoon wasted. 

Mr. Mac got home and took care of her while I napped some more. I was in bed by 8:30. "OK, now an evening wasted as well, but I will feel better tomorrow for sure!" I thought to myself as I downed some Alka Seltzer cold plus, which usually cures EVERYTHING. Oh, how naive I can be. 

So longer story even longer, today I am still feeling like bubble gum on the bottom of someone's shoe and I am moving in slow motion. If I get laundry done it will be a miracle. 

Until I can get to those "baking experiments" here are some brownies!


There are these things called "Slutty Brownies" making their rounds on Pinterest lately. Supposedly, they are called "Slutty" because they are "easy and a little bit dirty." They consist of three layers: cookie dough,  Oreos and brownie batter. Since I made the Oreo Stuffed Brownies a while back, I decided to go with my favorite candy bar for the middle layer.

Also, since I am not a fan of food names that consist of sexual connotations (big pet peeve) I decided to call these "Monster Brownies." Have you seen Monster Cookies? Kind of the same thought process. 

First, I pressed a roll of refrigerated cookie dough (I let it soften a bit by sitting it on my counter for about an hour) into a 9 x 13 greased pan. 


I chopped two bags of Snickers Minis in half. (I found them on clearance after Easter. Bonus!)


Let's just take a moment to soak all of that in...


I could have stopped right there with a big ole glass of milk, my couch and one of my favorite TV shows. But I thought of you guys and plowed on. The sacrifices we make...


I layered in the chopped Snickers.....


...and followed those by a prepared brownie mix. Then, into the oven. 


These are TOTALLY delicious, but I had some issues.

The recipes I found for the Slutty Brownies all said to bake at 350 for 30-40 minutes. I baked these for an hour and the brownie part still did not get done to my liking.  I didn't realize this until they were cooled which is too late to pop them back into the oven.

The edges were great about two inches into the middle, but from there the brownie part was still too batter-ish for me. Some people I talked to said they are fans of brownie batter but if you are like me and want yours completely baked, you might want to reduce the heat in your oven to 325 and bake them for an hour and 15 minutes to an hour and a half. OR, cut the recipe in half and still use a 9 x 13 pan so that the layers are thinner and bake up better.

Regardless, these were some killer brownies. And you could use just about anything for that middle layer. I even considered Nutter Butters at one point. I bet those would be fantastic!

Let me know what versions you try!

~~~~~~~~~~~~~~~~~~~~~~~~~~~~~~~~~~~~~~~~~~~~~~~~~~~~~~~~~~~~~~~~~~~~~~~~~~~~
There's a new feature here at To Bake or Not to Bake! 


Want to be updated by email each time there is a new post? Enter your email address at the "Follow by Email" prompt under the cupcake at the top left. After you complete the letter verification on the next screen, you will receive a confirmation email. Click on the link in that email and you're set! Now, every time I publish a new post you will get an email notification!


If you have any questions, feel free to email me at the address in my profile. 

Pin It!

Tuesday, April 10, 2012

Brown Sugar Raisin Bread


For me, bread is the ultimate comfort food. Give me a plain old piece of white bread and a dab of butter and I'm no good to anyone for the next half hour. Throw in some brown sugar, cinnamon and raisins and this girl can just call it a day.

Making bread by hand is a true talent and lost art. I have patience for many things when it comes to baking and while I enjoy eating homemade bread, kneading the dough exceeds my patience quota.

Thankfully, my stand mixer is equipped with a dough hook. To me, that is simply a magical thing. You mean I don't have to knead by hand? I can stand there with a glass of iced tea, file my nails, chat on the phone (yeah, because THAT is what I do with my free time) and watch my little green machine do all the grunt work? And you mean to tell me, at the end of it all I will have soft, warm slices of heaven that melt in my mouth? Sign me up!

My cousin Ellen gave me "Bread," a Williams-Sonoma cookbook when I got married. While flipping through it recently, I came across their recipe for Brown Sugar-Raisin Bread and knew right away that it had to be the inaugural bread for my mixer.

This bread, like most traditional recipes, rises twice. The trick is, after the first rising the dough is flattened into a rectangle, sprinkled with a brown sugar and cinnamon filling, rolled into a log and tucked into a loaf pan.


Once in the pan, it rises for the second time...


and is then baked until golden brown.


What results is a soft and chewy treat full of raisins, interrupted by a swirl of gooey filling. It's fabulous as is, but is even better toasted with just a smidge of cinnamon butter. The latter kept me in breakfast for about two weeks. There's not a better way to start the day, in my opinion!


Brown Sugar-Raisin Bread

Ingredients:
1 tablespoon active dry yeast
3 tablespoons granulated sugar
1-1/4 cups warm water (105-115 degrees F)
1 cup warm milk (105-115 degrees F)
3 tablespoons unsalted butter, melted, plus extra for greasing
1 tablespoon salt
1 large egg, lightly beaten
6 to 6-1/4 cups bread flour, plus extra if needed
3/4 cup golden raisins
3/4 cup dark raisins

For the filling:
 2/3 cup firmly packed brown sugar mixed with 4 1/2 teaspoons ground cinnamon


Directions:

-In a bowl, sprinkle the yeast and a pinch of the granulated sugar over 1/2 cup of the water and stir to dissolve. Let stand until foamy, about 10 minutes.


-In a heavy duty mixer fitted with the paddle attachment, combine the remaining water, the milk, melted butter, remaining granulated sugar, salt, egg and 2 cups of the flour. Beat on medium speed until creamy, about 1 minute.  Add the raisins , then beat in the remaining flour, one cup at a time, until the dough pulls away from the sides of the bowl.


-Switch to the dough hook. Knead on medium-low speed, adding flour 1 tablespoon at a time if the dough sticks, until smooth and elastic, about 4 minutes. Transfer the dough to a greased deep bowl and turn to coat it. Cover loosely with plastic wrap and let rise at room temperature until doubled in size, about 1-1 1/2 hours.


-Lightly grease the bottom and sides of two 9-by-5-inch loaf pans. Turn the dough out onto a lightly floured board. Divide the dough in half and roll or pat each half into an 8-by-12-inch rectangle. Lightly sprinkle each rectangle with half of the filling, leaving a 1-inch border on all sides. Beginning at the narrow end, tightly roll up each rectangle into a compact log. Pinch the ends and the long seam to seal the filling. Place each log, seam side down, in a prepared pan. Cover loosely with plastic wrap and let rise at room temperature until about 1 inch above the rim of each pan, 1-1 1/2 hours.


-Preheat over to 350. Bake until the loaves are golden brown and pull away from the sides of the pan, 35-40 minutes. Turn out onto racks and let cool completely.

Pin It!

Saturday, April 7, 2012

Happy Easter !


There's nothing quite like being elbow deep in icing and out of nowhere your nose starts itching. Good times. For some reason it happened to me about 4 times this morning while I was piping the nests onto these Eater inspired cupcakes. I could do nothing but keep decorating and force some happy thoughts.

The first tulips of spring....

The Big Bang Theory....

Kosmic Karma pizza from Mellow Mushroom....

Zac Efron...(yes, I could be his much older sister but you gotta admit, he's pretty.)

....what was I saying? Oh, yeah, cupcakes.


My friend Terri Jo pointed me in the direction of these cupcakes from some pictures she found online. Different versions of them are all over the internet so I didn't come up with the idea on my own. As The Hungry Housewife, Leslie Green, stated the other day, "No one invents anything these days." However, I did put my own touches to them and I am very happy with how they turned out. 


I made chocolate cupcakes and topped them with a layer of green icing. Using a grass tip, I piped chocolate icing in a circular motion building up around the edges to form the "walls" of the nest. I placed chocolate candy coated eggs in the nests and added a candy butterfly embellishment. 

They took a bit more time than the cupcakes I have done lately, but they were lots of fun and turned out super cute! Now, if only I can keep Baby Mac out of them until tomorrow...


A very Happy Easter to you and yours!!

Pin It!

Friday, April 6, 2012

Can't Do Without


I think I have mentioned before that I am a perfectionist of sorts. In certain aspects of my life, I like things precise and just so. It bites me in the backside sometimes. But fortunately, I have some things that help me get there. These scoops fall into that category. I LOVE them. They make every treat in a batch uniform and just the right size.

I use the small one for cake balls and truffles. The medium size is a MUST for cookies and the large one holds the perfect amount of batter for cupcakes. I will never again use regular spoons for any of those tasks.


I can't do without these kitchen cohorts.

Pin It!

Wednesday, April 4, 2012

Ten-Hut !

I have been told that because the phrase "Ten-Hut!" is just a shortened version of "Attention!" it's not really an official or proper military command. It's kind of like military slang. In fact, it's use is not looked highly upon as it is seen as unprofessional in the armed forces and can result in the "dressing down" of an officer.

If the person who told me this was playing a frivolous April Fool's joke, please let me know.  I would hate to misinform my readers. I know you guys rely on me greatly for my general knowledge of useless information. (Insert sarcastic winky face here.)


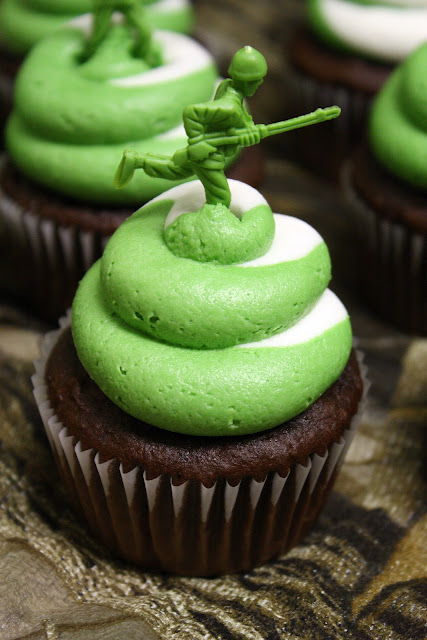
My friend Christina has a son with a birthday today and he loves army men. For his special day I made Army Man Cupcakes.


I made chocolate cupcakes and added about half a cup of mini chocolate chips to the batter. I will do this from now on when I make chocolate cake of any kind. I tasted one of the extras pre-icing and these babies can stand on their own with all that chocolate flavor!

I made my aunt Joanna's buttercream icing, left half of it white and matched the other half to the color of the army men. I used a large round tip and the swirl technique I mentioned a while back. The tutorial can be found at Our Best Bites.  It's SO easy.

For the army men I used wire cutters and removed the flat base in between their feet. I didn't want it flattening out my icing.  Without the base I was able to just plant their feet into the icing, which looks more realistic and less awkward.

"So you wanna stick your finger in this icing, huh? Not on my watch!"

This guy up there is my favorite. He is positioned as if he were meant to defend that delicious mound of buttercream frosting.

"You mess with my buddy or his icing and you mess with ME!"

And this guy has his back.

Happy Birthday, Jamil!

Pin It!

Monday, April 2, 2012

Vanilla Bean Gelato

This is a total "Not to Bake" item. And man, is it a good one.

Last night I needed a sweet fix.

I know you guys probably think I indulge in every sweet thing I make, but I really don't. Most of my goods are given away. I COULD eat them all myself, but I choose not to. Plus, when I am so involved in the process of making and photographing these treats, it just doesn't always appeal to me to eat them. I taste test everything, and there ARE some things that have a bit of a Kryptonite effect on me, but for the most part I keep a pretty professional relationship with my creations.

But, last night my lack of sugar caught up with me. And ice cream sounded like the perfect fix.

Ice cream and I CAN in fact have one of those Kryptonite-esque associations, and last night I could have easily OD'd on a half gallon, so I decided to keep it simple. I set my sights on a pint of something or possibly even one of those single serving sizes.  

As I roamed the grocery aisle my attention was diverted to this:


The elegantly simple and modern packaging immediately caught my eye. My hope was that Talenti Gelato would taste as gorgeous as it looked.

Wow, did Talenti deliver and then some! It's smooth, EXTRA creamy and the vanilla flavor is so vibrant without being too much. It is FAN-FREAKIN-TASTIC.

Mr. Mac is not a huge sweets fan but we were on the same page with this one. I handed him the pint as I went to check on our daughter who was in her room finding every reason possible to avoid bedtime. 

Baby Mac: "Bite?" (Translated: "Pacifier")

Me: "Yes, here is your pacifier. Please stop throwing it on the floor. Good night." She knows if we hear it drop to the wood floor we will immediately come to her aid and so it has become her favorite game. We  only recently realized that we have been suckers so now we don't jump as soon as we hear it hit the floor.

Baby Mac: "Baby?" (Translated: "blanket") 

Me: "Yes, here is another blanket. That brings the total to 5. I have a feeling you are going to be eaten by all of these blankets through the night and I will be playing 'Where's Waldo' in the morning. Good night."

Baby Mac: "Baby?" (Translated: "baby."  I can decipher between "baby" and "blanket." It's a gift.)

Me: "Okay, we have baby #1, baby #2, Cookie Monster, Bunny (or as she calls him, "Bubby"), baby #3 and Pig. I think you have more than enough company. In fact, we might be breaking some kind of fire codes. Good night."

By the time I got back into the living room, my husband had put a pretty large dent in the gelato and was begging me to take it away before he consumed it all. That, my friends, is the test of a indulgent dessert. If my husband has trouble resisting, it's golden. We just might buy stock in this company.

And the label may be the best part:

See those little black vanilla flecks? It's like my taste buds won the lottery.

That is just about everything I want to see in a food label. The list of ingredients doesn't read like a who's who of things I can't pronounce. And the fact that it's gluten free, hormone free, and all those other fun traits, just makes it that much more enjoyable.

So how is gelato different from ice cream? Gelato has less air churned into it resulting in a more dense and rich texture. Gelato is about 15% air where its ice cream counterpart is about 50%.

Another great feature? Gelato has much less fat. Ice cream typically has lots of milk and/or cream and eggs. The fat content is around 16%-26%. Gelato contains no eggs and only a small amount of cream and/or milk (or just water, if it's a sorbet) resulting in a fat content of about 2%-8%.

I purchased this gelato at my local Kroger. It also comes in such flavors as Double Dark Chocolate, Caribbean Coconut, Belgian Milk Chocolate, Roman Raspberry, Seal Salt Caramel (which I will fervently petition my store to carry), Black Cherry and more.

Check out Talenti's website and see what makes them so special and remarkably delicious!

~~~~~~~~~~~~~~~~~~~~~~~~~~~~~~~~~~~~~~~~~~~~~~~~~~~~~~~~~~~~~~~~~~~~~~~~~~~
 2 things:

1. Talenti did not pay me to say these things. However, I would not turn them down if they wanted to. And if they felt the need to send some free schwag my way, I would not be insulted. Ahem...

2. Thanks to my friend Amy for helping to edit my posts. She takes time out of her lunch break to read over what I write and tell me what works and what doesn't. She is the Rodgers to my Hammerstein.


Pin It!