Wednesday, February 29, 2012

Be Right Back...


I apologize profusely for not posting Monday as promised. I have had a very sick baby and I now have whatever she had. Makes for an interesting week to say the least.

Don't worry. I will be back very soon (hopefully tomorrow, but don't hold me to that) with pictures from the shower, some things I can't do without and brown sugar raisin bread.


Pin It!

Thursday, February 23, 2012

Oreo Stuffed Brownies

I didn't take this picture! Bake at 350 gets all the credit.

I have a teething toddler on my hands. She currently has 3 honkin' molars coming in at the same time so, needless to say, she is pitiful in every sense of the word. I have not had time to make anything this week.  We are throwing a family baby shower for my sister this weekend so I will have a wonderful post for you on Monday full of sweet treats and great pictures courtesy of my new camera lens! (Fingers crossed it gets delivered tomorrow.)

Until then, check out one of my new favorite places, Bake at 350. She is so unbelievably creative. She makes the most gorgeous cut out cookies and tons of other fun treats. Her site makes me feel like a kid again!

I was thrilled to see her post today. Remember the Birthday Cake Oreos? Look above at the tempting concoction she made with them. Oreo Stuffed Brownies. Holy crap. My mouth is literally watering.

Pin It!

Tuesday, February 21, 2012

Not to Bake

Move along, folks. No baking to see here.

Happy Fat Tuesday!

Want to hear something funny? Not really "ha ha" funny, but more "you're really weird" funny.

I am not much on cupcakes.

There. I said it. Feels good to be out of that closet.

I will take a small test bite or two, but cupcakes and I don't have the dysfunctional relationship that Oreos and I have. My husband feels the same. Needless to say, the majority of the cupcakes I make are given away. But only after my daughter has had a few. Ever since her first birthday, when she sees a cupcake she squeals like Elmo himself is standing in front of her.

The other day while I was frosting my practice batch, she was intently watching me. Out of nowhere, she excitedly picked up her play cell phone and "called" someone. The only words I understood were "mama," "cupcakes" and "okay, bye!" This must have been breaking news on the toddler circuit.

After all the recent cupcake making, I needed a salty/sweet snack. For me, salty/sweet snacks are in the same realm as Oreos. Only slightly more dangerous.

Lately, I have been seeing lots of variations of chocolate covered popcorn on the internet and I had to give it a try. Here is where the "Not to Bake" part of this blog comes into play. (I will have more of these posts in the future.) This recipe involves no baking. It is so incredibly easy and the results are super fantastic. 

Chocolate Covered Popcorn

1 bag white chocolate chips
1 bag microwave popcorn (preferably natural flavor with no butter)

Pop the corn as directed. 

Pour chips into a microwave safe bowl and cook 1 minute on high. Stir. Repeat at 30 second increments stirring in between until chips are almost melted. Once the majority of the chocolate is melted and there are just a few chips left, keep stirring them into the warm chocolate and they will melt on their own. This keeps you from having to microwave the chocolate further and avoids the risk of scorching. 

Pour the chocolate over the popcorn and toss to coat. It's easiest to use your hands here. Yes, it is messy, but I found a spoon or spatula doesn't work as well and tends to just crush the popcorn.

Once the popcorn is coated, pour onto a parchment lined cookie sheet and allow the chocolate to set up. (This is where I tossed on some of that purple sugar.) Break into pieces and place in an airtight container.

There are so many ways you can go with this recipe. Of course you could use milk chocolate instead of white. You could toss in nuts, pretzels, colored sprinkles or M&M's. You could even accent  the white chocolate popcorn with a drizzle of  milk chocolate, and vice versa. 

Have a great Mardi Gras!

Pin It!

Monday, February 20, 2012

Because It's Monday

This picture makes me happy.

I made  a batch of cupcakes this weekend as practice for an upcoming project. (More to come...)

For those of you who, like me, are working this President's Day, I thought I would share a picture of one since it's hard to to look at a cupcake and not smile.

And who couldn't use a smile on a Monday?

Pin It!

Sunday, February 19, 2012

Happy 100th, Oreo!


Did you know that Oreo cookies were invented in 1912? Me neither. Not until I came across the fun little gems in the grocery this weekend. 

Now, I can count on one hand the number of times I have bought Oreos in the past 5 years. See, Oreos and I have an understanding. If they insist on making their way into my home, I will insist on eating every single one. Sometimes within 2 days. (The shame.) So we agree that our relationship is too volatile for us to meet on a regular basis. 

But this weekend was an exception. I mean, how could I resist? BIRTHDAY CAKE OREO COOKIES? Come on. Could you say no?

I am happy to report, however, I have only had a couple. Most of them are still left. 

Apparently while letting me sleep in this morning, my husband let our daughter have one for breakfast. It was obvious when she came running up to me with outstretched arms shouting "Mama!" and her face looking as if she had been eating dirt. The control freak in me had to let that one go. Since it was her first one ever in life, I just looked at it as her Oreo right of passage.  

Happy Birthday Oreo!

Pin It!

Friday, February 17, 2012

Cupcake Swirls

I had some leftover batter from the mini cupcakes  so I made 6 standard ones to practice piping on later. Specifically, I wanted to try swirls with an extra large star tip. I LOVE the results from a large tip. So exaggerated and pretty.

I just got some new tips from Amazon, as well as some disposable pastry bags which I HIGHLY recommend.

I didn't even need a coupler to attach the tip since I wasn't planning on switching it out for another one later.  I just snipped off about two inches of the pastry bag, dropped the tip inside and slid it down into the end nice and snug. (I'll share more on this in a future post.)

Large closed star tip

It is really quite easy to pipe a swirl. My aunt Joanna had filled me in on some tips, no pun intended, and I thought I would show you the results. I used a closed star tip (shown above) this time around.

The first is your typical swirl design. Remember those curly Q doodles you used to draw as a kid? It's basically the same thing. 

To start, place your tip at the edge of the cupcake. 

Squeeze the bag and swirl around until you get to the center. 

Stop applying pressure and lift your piping bag straight up in the air to get that small decorative star of icing.
 
Starting from the outside and working in.

The second one is a rose type of swirl. It's done in a reverse fashion. 

This time, start right in the middle and swirl  around until you reach the outer edge. 

So simple with such pretty results!

Starting from the inside and working out.

With just the right tip, a disposable bag and some icing, you can turn out some very pretty cupcakes with little effort!

Pin It!

Thursday, February 16, 2012

Can't Do Without

I feel like I have hit the jackpot today.

My dad gave me his old iPod. I mean OLD. It was originally given to my sister for Christmas years ago and she passed it on to him a while back. It's the iPod Mini and the screen is just digital black and gray. No color. No album artwork. It is one of the first to be made. It's ancient in terms of technology.

Hang on. The jackpot part is coming, I promise.

I have a Sony Walkman MP3 player that I LOVE. No, I have not owned an iPod until now. I also don't have an iPhone or iPad or iAnything. I like to stay a bit away from  the mainstream, thank you very much. Plus, I enjoy being a weirdo who's not especially predictable. 

Anyway, there are some Podcasts I have wanted to check out and in order to listen to them in my car, I need an iPod.

So last night I downloaded iTunes and plugged up the old Mini to charge overnight. When I checked on it this morning I noticed that  iTunes said it was loaded to capacity. I turned it on and opened the "Artists" folder to see what I could delete. I suddenly felt like it was Christmas morning. My mouth dropped open and a loud "Woo Hoo!" followed. 

My dad had loaded this baby FULL of the greats! Abba, The Beatles, Electric Light Orchestra, Marvin Gaye, Simon and Garfunkel, Crosby Stills and Nash, The Temptations, Bob Welch, Joe Cocker, Fleetwood Mac. (I could seriously go on for two more paragraphs.) All the music that filled the house I grew up in.

I had ELO's "Livin' Thing" cranked up on the way to work this morning. I was dancing in the seat and my little girl was laughing like I was an idiot. Good times. 

Needless to say, no music will be removed from this player and the Podcasts will just have to wait. The iPod Mini is going to be something I can't do without for a while.

So what does this have to do with baking? Not a thing. Except that there are lots of things I use when I bake that I also can't do without. I often find myself actually telling these lifesavers how much I appreciate them. 

"I don't know what I would do without you!"

"Where have you been all my life?!"

"You are the best thing ever!" 

"You are so great! Do you think you could help with the laundry, too?" The stand mixer just gave me a blank, silent stare on that one.

I have decided to write an ongoing series of posts about all the things that make my baking life easier. Those wonderful gadgets and magic ingredients I just have to have around.

Which brings me to this great wonder of the baking world:

A baker's best friend.

Powdered buttermilk!

I can't tell you how many times I have bought a quart of buttermilk for a recipe that called for just a cup, only to have the rest sit in the fridge way past its expiration date. (Can anyone tell me why isn't it sold in anything smaller than a quart?) And making your own concoction with whole milk and vinegar is just not the same to me.

Powdered buttermilk is the answer. Say a recipe calls for a cup of buttermilk. You simply mix 4 tablespoons of the powder in with your dry ingredients and add in a cup of water with your wet ingredients. It's that simple! The results are fantastic and it keeps in the refrigerator for at least a year.

I could give you all the boring science behind how it's made and why it works, but trust me, it rocks. I don't know if the person who invented this product has been given his or her proper commendation, but I am here to say I will dance at your wedding. Though, it apparently came on the market in the 70's, so maybe I should change that to "your granddaughter's wedding."


Pin It!

Tuesday, February 14, 2012

Happy Valentine's Day!


Devil's Food Cupcakes with Vanilla Buttercream Frosting

Buttercream icing should be taxed the same as cigarettes and alcohol, as it's full of lots of things that are not very good for you and it can be just as addictive.

But man, oh man, is it one of the best things in life.

That's why this go around I went with mini cupcakes. I get my sinfully good icing but in small doses. Then, if I eat three (or six) of these I don't feel like I have broken some sort of law. Plus, the tiny cupcakes make me feel like I'm a giant and that's always a good time.

The cake is just a  Devil's Food boxed mix. I wanted to focus more on my piping skills for this project than the cake baking so I made it easy on myself. The icing is a simple and delicious Vanilla Buttercream recipe I found on Cookies and Cups. You can check it out here. I used red and rose Wilton gel colors to get the icing bright pink.


Hope your Valentine's Day is full whatever your heart desires! For me, that would be take out and a night on the couch. I am a simple woman to please.

Pin It!

Monday, February 13, 2012

Pizza Dough


I was a bit under the weather this weekend and actually spent most of my Saturday asleep. (Thanks to my mom for babysitting!) Baking was not in the cards for me, however, I did find the time Sunday afternoon to make homemade pizza. 

Since my new stand mixer has a dough hook, I have been dying to use it. We are big fans of pizza and I often make it homemade, though I always use a bought quick crust mix. I came across a recipe for Fool-Proof Pizza Dough on a great food blog, Lauren's Latest, and decided to use it for my dough hook initiation. It was fabulous!

Lauren actually used the recipe to make Cheesy Garlic Bread Sticks (Yum!), which bodes well for this much crust, but if you are are a thinner crust kind of family like mine, this recipe could really make two pizzas.

Lauren also had a great tip for helping your oven give pizzeria style results and again she hit a home run!  

Just put a pizza stone (or an inverted cookie sheet) in your oven and set your the temperature to preheat as high as it will go. (Mine maxes out at 500.) Press out your dough on a sheet of parchment paper (be sure you don't stretch it bigger than the surface you are baking it on) and transfer it right to the stone, parchment paper and all. (Once you transfer it, cut off any excess paper so that it doesn't hang off the side touching the wire rack. Mine started to singe a bit and my kitchen got smoky!) Bake for 9-12 minutes or until the cheese is bubbly.

The crust comes out perfectly crisp on the bottom while nice and chewy throughout. I will never cook homemade pizza any other way. Thanks, Lauren!

If I wasn't feeling so cruddy I would have more pictures than the one above. Lauren's awesome post covers the recipe and all the steps in beautiful photographs. Click here to check it out!

See you next time with Mini Valentine Cupcakes!

Pin It!

Friday, February 10, 2012

10 Cup Cookies

Copyright © To Bake or Not to Bake 2012

This isn't a very pretty cookie. It's flat, yet bumpy. It doesn't photograph well.  If you're going for looks, you'll have to search elsewhere. (It was a tough photo shoot. I kind of know how Nick Nolte's mug shot photographer felt.)

Now, if it's personality you're after, THIS is the cookie you want in your corner. It's chewy, full of flavor and I promise you can't eat just one.

Upon taking a bite, a priest once said, "Wow. I need to go to confessions after eating this." True Story. They are THAT good. 


A family friend gave this recipe to my mom years ago. It's very easy, it makes A LOT of cookies and they are always a hit. This cookie has never lets me down. 

10 Cup Cookies

1 Cup butter, softened
1 Cup flour *
1 Cup white sugar
1 Cup Brown sugar, packed
1 Cup Peanut Butter
1 Cup Chocolate Chips
1 Cup Raisins
1 Cup Walnuts
1 Cup coconut
1 Cup oats
1 tsp. baking soda
1/2 tsp baking powder
2 eggs

Cream together butter, sugars, peanut butter and eggs. 

Mix in flour, baking soda and powder. Incorporate remaining ingredients one at a time. 

Drop rounded tablespoons onto a non-stick or parchment lined cookie sheet. 

Bake at 350 for 11-13 minutes. 

Let the cookies rest for about 10 minutes before transferring from the cookies sheet as they are somewhat fragile until they cool. 

(Here's a secret: Yes, cookies are heaven right out of the oven and these are  tasty while still warm, but they are absolutely at their best the next day.)


Feel free to alter this recipe if you need to. If you can't have nuts or don't like coconut, just double one of the other ingredients or add a cup of something else. Be creative! (I once used toffee chips in place of the coconut and I often use dried cherries because I am not a huge raisin fan.)

*Since the flour is really just there to hold all the other ingredients together (not necessarily to give this cookie lift) you could easily get away with gluten free flour.

Enjoy!

Pin It!

Thursday, February 9, 2012

For the Love of Pinterest

Petit Fours pinned to Cake Ideas


You've probably heard me mention Pinterest a few times. Heck, you have probably heard lots of people talking about it. You may have friends you haven't seen in months because they've been glued to their computer for days on end, zombie-eyed with disheveled hair.

It's the new crack.

It's the website equivalent of Justin Bieber.

It's bigger than Pajama Jeans. 

It's...okay, I'll stop. I could do this all day.

For those of you not familiar with Pinterest, it's a virtual bulletin board for all the wonderful internet finds you want to hang onto. Recipes. Crafts. Clothes. New products. Favorite websites. You name it. You find it on the internet, you can save it on Pinterest.

Salted Caramel Hot Chocolate Mix pinned to Food Gifts

Anything found online that is of interest to you can be pinned onto boards in categories you create. (See how they did that? Interest + Pin = Pinterest! I absolutely love it!! I'm a cheap date. What can I say?)

Your friends can follow you and, in turn, you can follow others to see what fabulous things they come across.

It's great because you can access your Pinterest account from any computer with internet. Just log into Pinterest like you would Facebook and there are all your treasures! No more contemplating dinner saying, "What was that recipe I wanted to try?," only to realize it's saved in your bookmarks on your computer at WORK. (Yes, this has been me many, many times.) Now, you can pull up that recipe on your computer at home, your iPad or any mobile device.

It's also great because you organize your pins by naming the individual boards in your collection. (Ah, organization. Makes a girl happy.) A few of mine are, Cupcakes, Cooking Tips, Crafts for Kids, Books I want to Read, and Products I love.

Hulling Strawberries With a Straw pinned to Cooking Tips

I have been introduced to so many amazing cooking blogs as a result of Pinterest. I have tried lots of recipes and have a wishlist of baked goods I want to create and share here. I have a board for Cooking Tips and one for Cake Decorating tips that have both already saved me more than a few times. I have found beautiful decorating ideas, coloring pages for kids, uplifting quotes and more.

I could go on and on about all the reasons I love Pinterest. (Seriously. Call me. We'll talk for hours.)

Liquid Sidewalk Chalk pinned to Crafts for Kids

To join, you have to request an invitation. You can do this on the website but it takes a while to get a response. It's much quicker if it comes from a current member so feel free to email me and I will send you an invite.

Keep in mind, once you have an account you need to install the "Pin It" button to your browser. There are detailed and simple instructions on how to do this under the "About" tab.

If you want to follow my pins, just click the "Follow Me on Pinterest!" link above my profile picture to the right. I will "follow" you right back! Also, feel free to click to my "Pin It" button located at the bottom of each post if you want to share something or come back to it later!

Happy pinning!!

Pin It!

Tuesday, February 7, 2012

Practice, Practice, Practice

Mmmm...aluminum with Crisco. My favorite.

My aunt, Joanna, has been decorating cakes for as long as I can remember. She is self taught and does beautiful work. It's always a treat to see her latest creation! I asked her last week if she would be willing to teach me some basics next time I am in town. In the meantime, she suggested a great way to practice piping: shortening and an inverted cake pan. So genius! (Apparently, that is how cake decorator newbies are trained.) It's ideal for four reasons:

1. The consistency of the shortening mimics that of icing.
2. The cake pan gives the feel of decorating on an actual cake.
3. Perfectly good buttercream doesn't go to waste.
4. Neither does the shortening. Just scrape it from the pan and use it over and over.

So last night, I gave it a go. I did as Joanna instructed and dove right in, piping away, changing  out tips and free-handing just to see what kind of shapes I could make. The picture above was my fourth attempt. (If you like this "masterpiece," you should have seen the three before it!) Each time, I just tried to fill up all the empty space on the pan to get in as much practice as possible, not concerning myself with the design as a whole. It was about learning how to hold and maneuver the bag while getting a feel for what designs each of the tips can produce.

This was my first experiment with a piping bag and I found it to be so much fun. I am a big fan of this practice method because I could just clean my "canvas" and start over many times without the commitment of a finished cake that I wasn't happy with. Decorating is definitely a skill that requires practice and patience. I am incredibly eager to learn all I can and I can't wait to have a finished cake to post for you guys. Until then, lots of other fun and tasty baked goods will be keeping you company.

Next up, Ten Cup Cookies!

Pin It!

Monday, February 6, 2012

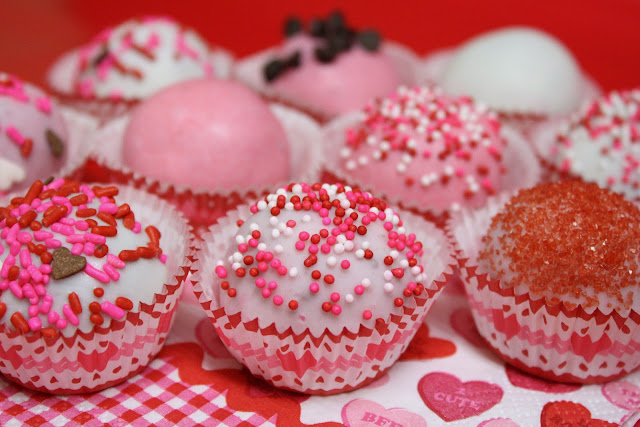
Cake Balls

All photos Copyright © To Bake or Not to Bake 2012 (Unless otherwise noted)

One night last week I baked a cake for a friend of mine. Nothing fancy, just a simple sheet cake. When the timer went off, I checked the cake but it wasn't quite done. The center of it still jiggled as I slid out the oven rack.  It needed just about 10 more minutes, I figured, so I sat down at my computer just to check my email. Before I knew it, I got caught up in editing pictures and a half hour had went by. The smell of the cake jolted me out of my concentration. I ran frantically to the kitchen and saved it from the oven. Amazingly, it wasn't as bad as it should have been. The edges were indeed burned to a crisp but the interior of the cake was unharmed. Though the cake as a whole was not (in my opinion) edible, I was determined to do something to salvage what I could and decided to make cake balls.


Cake balls are really just three ingredients: cake, icing and chocolate to dip them in. I have to be honest here. As simple as the ingredients make them sound, to me, they are very time consuming and I have a hard time getting them to look as clean and pretty as the pros do. But they are always a hit and very fun treats to eat!

This is how I make mine:

Cake Balls 

1 sheet cake (1 box mix, prepared)
1 container of icing 
Melting chocolate *

Crumble the cake into a mixing bowl. Microwave the icing for about 20 seconds (just enough to soften it a little) and stir. Pour over the crumbled cake. Mix well. (I also added 1/2 a cup of mini chocolate chips since I had some on hand.) Put the mix in the refrigerator for about an hour to make it easier to work with, then form into round 1-inch balls. (I use a small scoop to divide out the portions so that they are equal in size and then just rolled them in my hands to give them a good round shape.) Place rolled balls onto a parchment or wax paper-lined cookie sheet and then into the freezer for a couple of hours or even overnight.

Prepare your work area by laying out a few sheets of wax paper. Melt your chocolate according to package directions. Dip the cake balls into the chocolate, shake off any excess and place on the wax paper. Sprinkle with embellishments and allow to set up. 


The dipping is where things get a bit hairy for me. I always use a plastic fork with the middle tines broken out to dip the balls. It works pretty well, but I have a few issues. (I don't have any photographs of my mistakes so I hope what I say next makes sense.)

The first issue I have is that the excess chocolate tends to hang out on the fork and then transfer to the wax paper leaving a big messy puddle of chocolate around each ball that I then have to cut off once they set up. The edges are not very clean and pretty afterwards, but I remedied that this time by placing them in the decorative candy papers. It's all about improvising!

Second, when transferring the dipped cake balls to the wax paper they don't want to leave the fork very willingly. I used a toothpick at the very bottom of each one to help coax it off, but what sometimes happens is that in the process of pushing it off the fork, the ball tends to roll a bit causing any sprinkles or embellishments to be on one side of the ball rather than just on top.

Even though these were a bit challenging for me (I am open to any suggestions and tips!**) I love the learning process and photographing the finished product. In the end, I thought they turned out quite nice. And, I am told, delicious to boot! The compliments more than make up for all the hard work.


*I have mentioned before that I use the bark/chocolate that is packaged in its own tray to make things easier. Also, I used the white chocolate and tinted some of it different shades of pink. Colored candy melts work, too.

**My boss gave me a great tip this morning. She uses toothpicks to dip round treats. Insert the pick, dip the ball, gently shake off the excess the pull it out once it's on the wax paper. Most of the time chocolate will fill in the tiny hole, but if not, just dip the toothpick back into the chocolate and fill it in. I will definitely try this next time!


Pin It!

Sunday, February 5, 2012

Ain't She a Bute?

Not a fan of the picture, but you get the idea.

Here she is. Johnny's birthday present to me. I couldn't be happier. She is even more glorious than I ever imagined and I don't just mean her looks. Yes, she matches my kitchen walls perfectly in pistachio green but, wow, does this mixer make my life so much easier. I was an old school hand mixer gal and I have officially been reformed.

Thursday night I made a sheet cake (more on how I corrected that mega fail later) and I was ecstatic that the batter could be mixing on its own while I cleaned up my work space. What the what?! (In my best Liz Lemon voice.) You mean all this time I could have been the queen of kitchen multitasking? No more standing there holding my hand mixer while grocery lists write themselves in my head. Never again will I  stretch over to stir something on the stove only to lean the mixer just a bit too far sideways spewing batter onto my cabinet doors. And being able to clean up while the mixing is being done for me? That just made my year. Look out, world. Efficiency has moved into my kitchen and she's here to stay. 
Pin It!

Friday, February 3, 2012

White Chocolate Strawberry Fudge

Copyright 2012

This recipe is ridiculously easy. I had heard of two-ingredient fudge before, but only in chocolate form. I found this version at one of my new favorite sites, Cookies and Cups, and the recipe lends itself to so many flavor combinations!

2 Ingredient White Chocolate-Strawberry Fudge

1 bag white chocolate chips
1 can strawberry icing

Melt the chips in the microwave. Start with one minute, then stir and follow with 30 second increments stirring in between. Once the chips are almost completely melted, keep stirring until the last bits finish to avoid having to microwave again and risk scorching. 

Once melted, stir in the frosting. Pour into a greased or foil-lined 9 x 9 pan. Allow to set up before cutting (about 1 hour).

See? How easy is that?! It would be fun to experiment with different flavors. Peanut butter chips with Funfetti frosting and sprinkles. Butterscotch chips with cream cheese frosting. White chocolate chips with lemon frosting. Mint chips and chocolate frosting. I could do this all day...


Pin It!